26 min to read
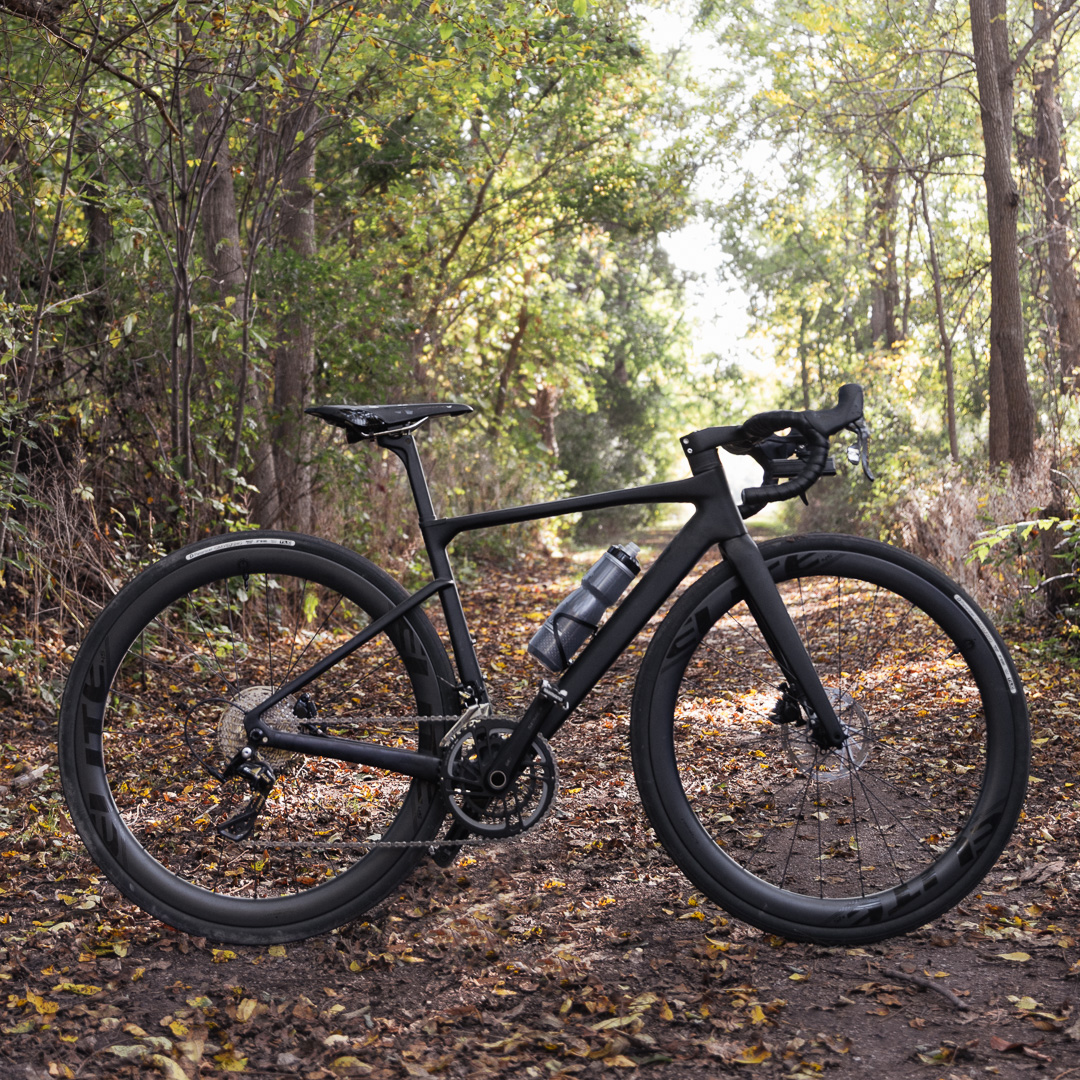
AliExpress All-Road Bike
Introduction
This project started in 2023 and was revisited in 2026.
I am not a serious cyclist, my interest in bikes comes mostly from appreciating them as machines, and I like working on them.
My first bike as an adult was a second-hand Georgina Terry Chrom steel road bike built with Tange double-butted chromoly tubing. It had a full Shimano 105 8-speed drivetrain with downtube shifters and Shimano wheels. A few weeks after buying it, I rode my first metric century on it. It was an uncomfortable, grueling and prolonged experience.
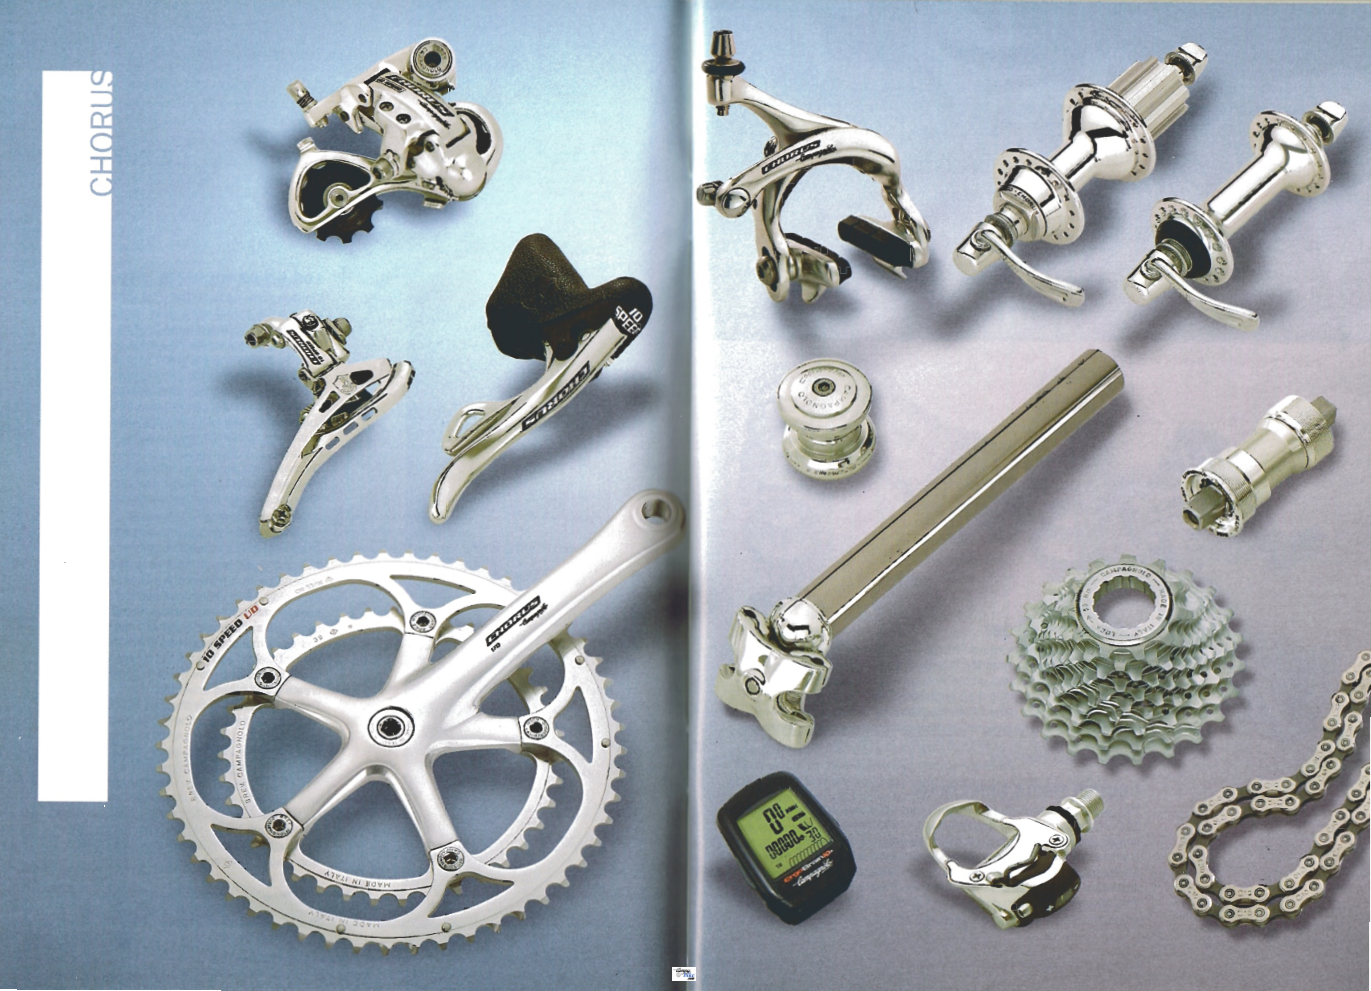
Being generally mechanically inclined, within months, I had stripped the bike down to the bare frame for a complete service which turned into a drivetrain overhaul. Having read the entirety of the late Sheldon Brown’s website (the Godfather of bike wrenching), I started to appreciate bicycles as a long-running argument between standards, eras, and mechanical compromises. One name kept coming up: Campagnolo. It had a reputation that was hard to ignore: deeply tied to road cycling history, slightly impractical, and mechanically distinct. I decided to upgrade the bike with a modern Campagnolo groupset. My first attempt was an early-2000s Chorus groupset, but the shifters were in poor working condition. I looked into rebuilding them, only to find that the replacement parts were either unavailable or unreasonably expensive. I returned the Chorus groupset and instead bought a 2012 Veloce groupset, along with Campagnolo Scirocco aluminium wheels.
Retro roadies- old frames with STI’s or Ergos
Since then, road bikes standards have progressively evolved. Today we have electronic shifting, hydraulic disc brakes, power meters, tire width has continually widened, and carbon frames are now normal rather than exotic. At the same time, Chinese manufacturers have become much more visible to Western buyers. Some sell directly through AliExpress or similar marketplaces; others appear to be closing the gap between factory, brand, and customer.
Open-mold carbon frames have been around for years, but I was cautious about them when I first started paying attention. The reputation was uneven, information was harder to find, and buying one still felt like an experiment. That has changed, there are now plenty of examples of Chinese frames that are well-engineered and well-reviewed, while some established Western brands have had their own design and quality-control controversies (BMC, Cervelo, Canyon to name a few).
The same thing is happening with drivetrains and components. Shimano, SRAM, and Campagnolo are still the familiar names, but brands like Sensah, L-TWOO, Wheeltop, and Magene are now part of the conversation. They are not coming from nowhere. Many of these companies have roots in the same manufacturing ecosystem that has supported the major brands for years.
I am more willing than most people to buy parts that require some research and mechanical sympathy. Moving from a 1990s steel road bike, modernized with 2010-era components, to a mostly Chinese parts build made sense for me. I knew the tradeoffs: limited support, unclear long-term reliability, and some chance of paying to beta-test someone else’s product. But I also like tinkering, and I wanted to see what these parts are actually like to live with. This build is my documentation of affordable Chinese bike components sourced mainly through AliExpress.
Part List
Overview of the parts. All prices are listed in CAD.
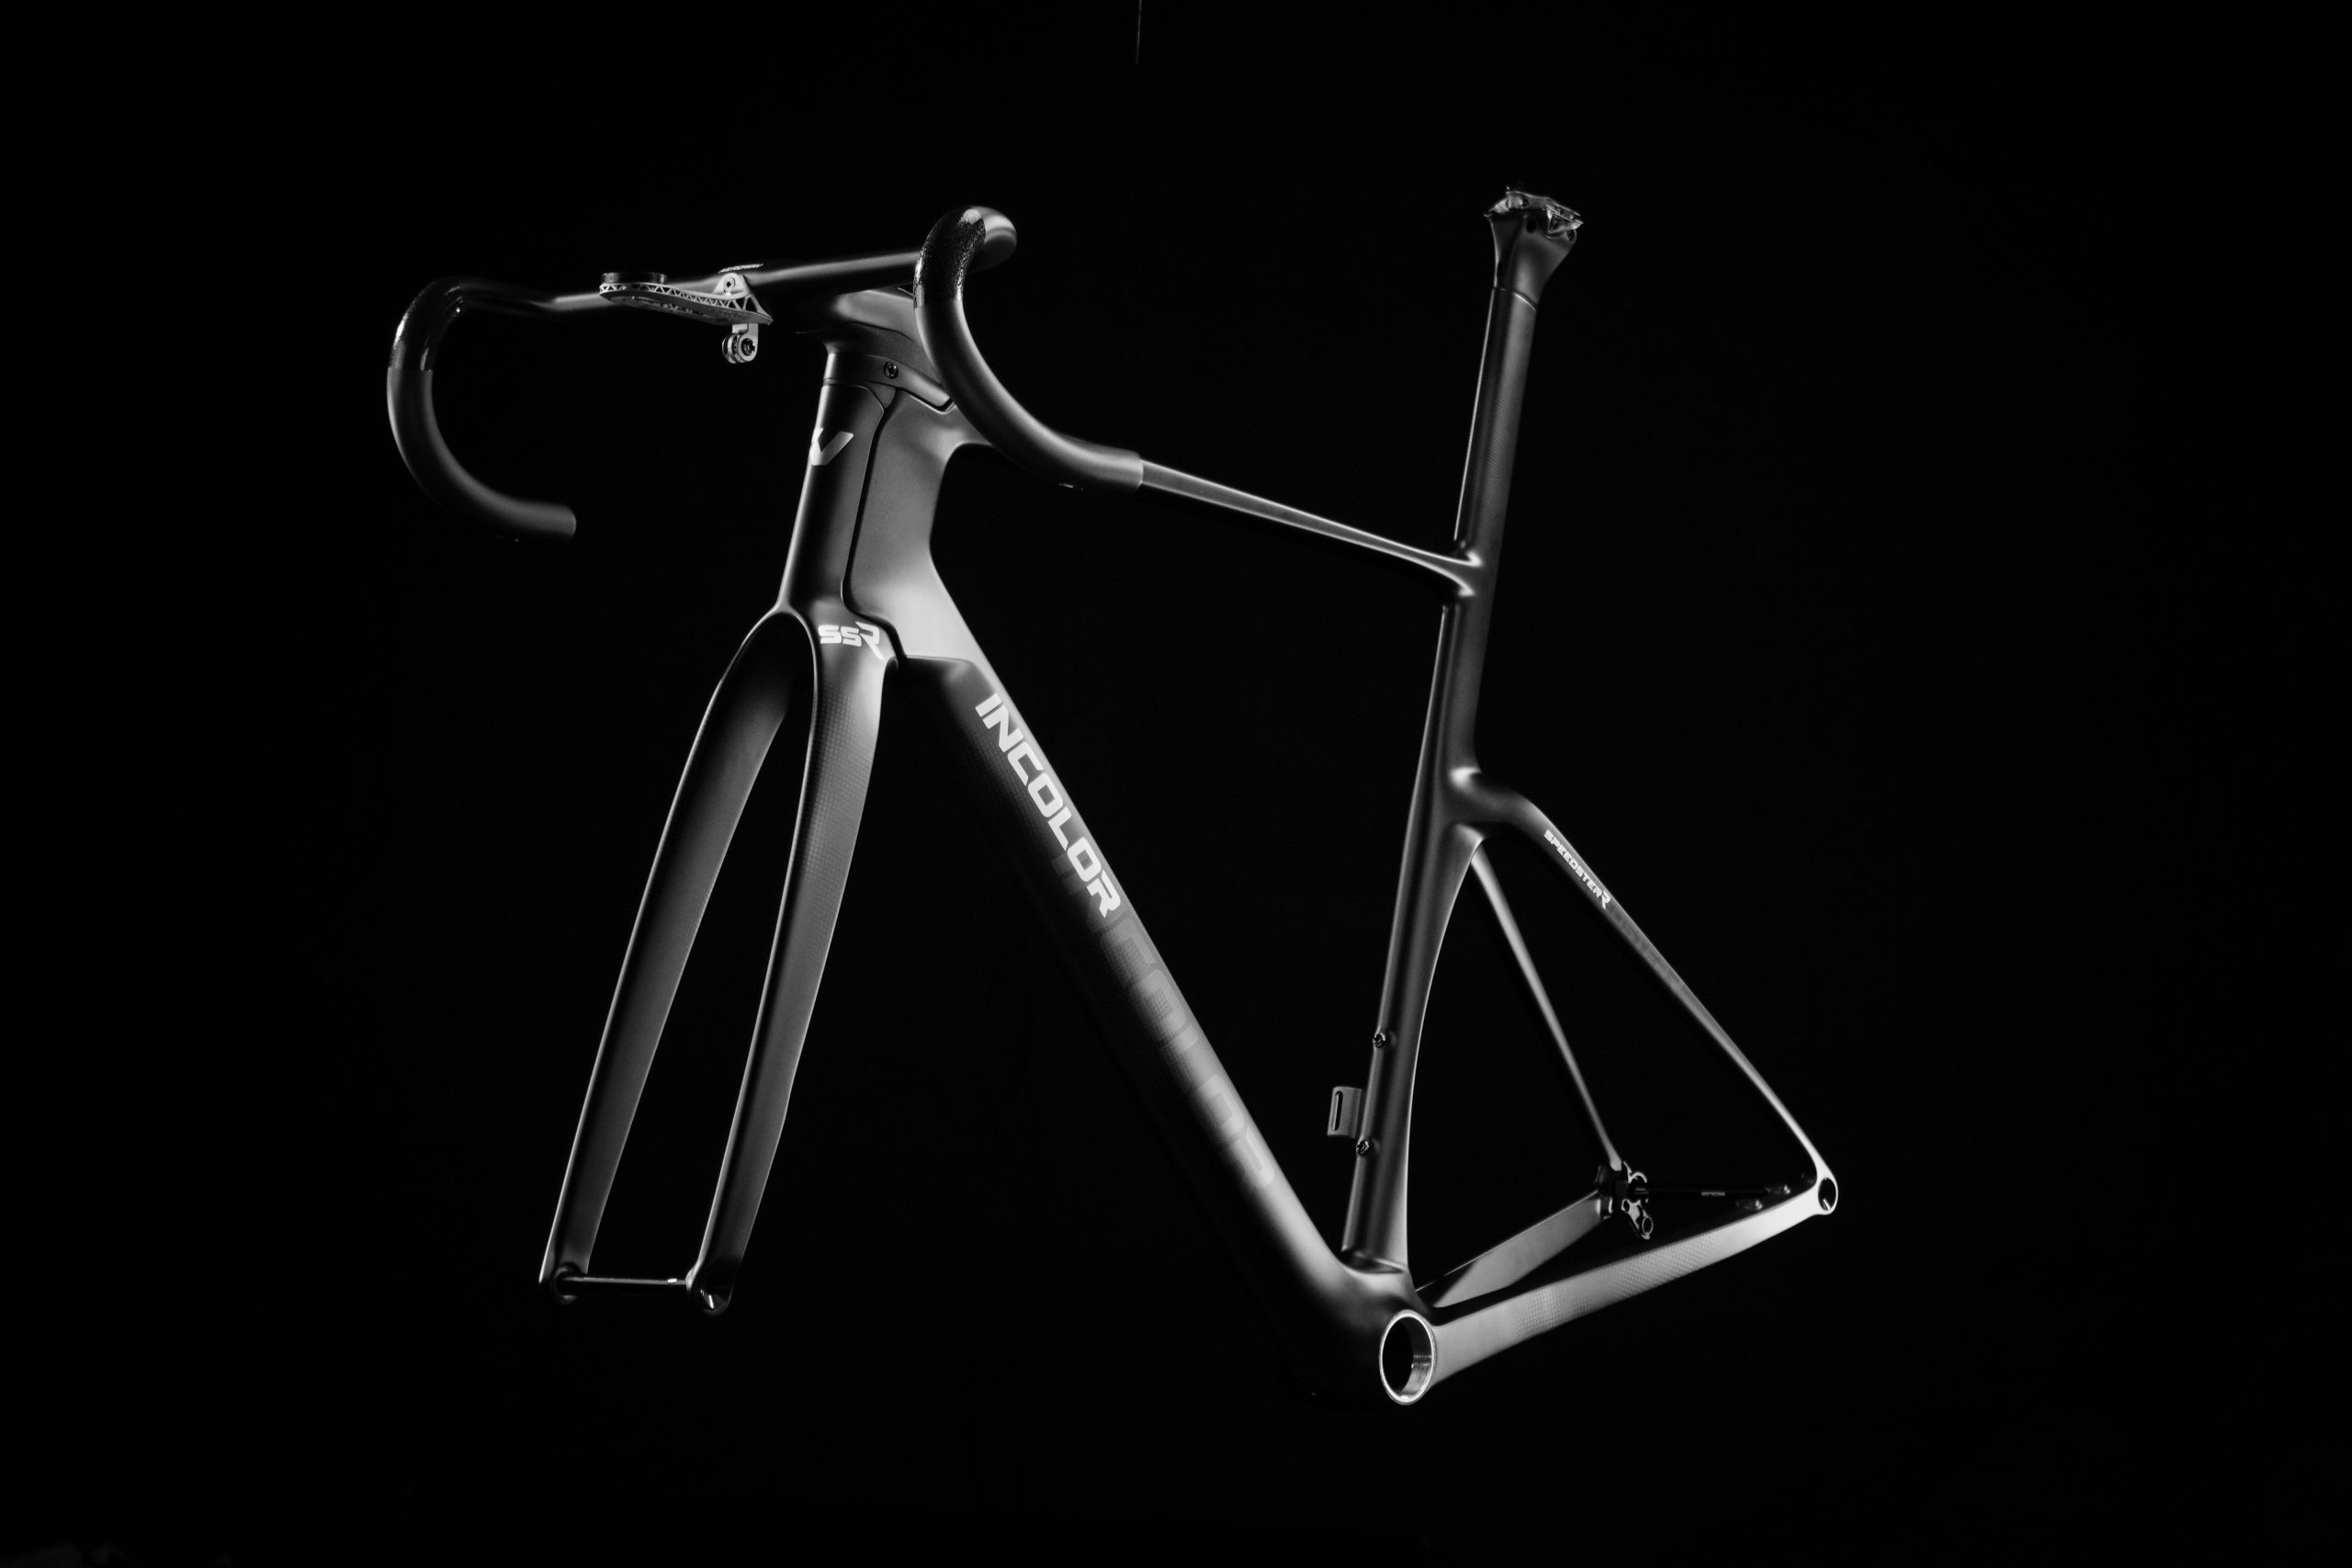
Frameset
Brands like Incolor, Yoeleo, Winspace, Tavelo, and Serk have built real reputations, and are now discussed less as “cheap Chinese frames” and more as bike brands in their own right. There are also long-running OEM manufacturers, such as FiberTek Composite in Xiamen, that have produced carbon frames for international brands for years.
Spcycle sits in a different part of the market. They sell affordable carbon frames, but they do not belong on the same playing field. They also have a fairly mixed reputation. I bought the Spcycle SP-053D which is heavily inspired by the Cipollini Dolomia.
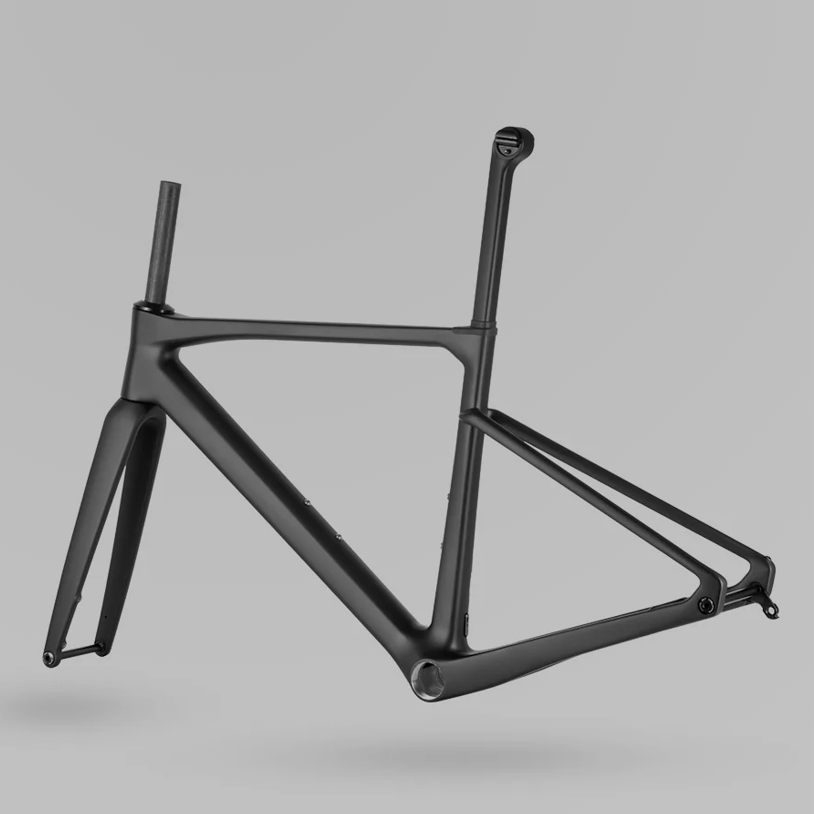
The 2023 version is listed with the following specifications:
- T1000 carbon fiber
- Full internal cable routing
- 1.5 inch headset
- Clearance for up to 700x32C tires
- Flat mount disc brakes, compatible with 140mm or 160mm rotors
- 142x12mm rear thru axle and 100x12mm front thru axle
- Press-fit BB86 bottom bracket
- Claimed weight: 900g frame, 370g fork, 220g seatpost
I paid $743.63 for the frameset which included the fork, seatpost, headset, handlebar, and thru axles. I later received a $78.96 refund, for reasons I will get into below.
Groupset
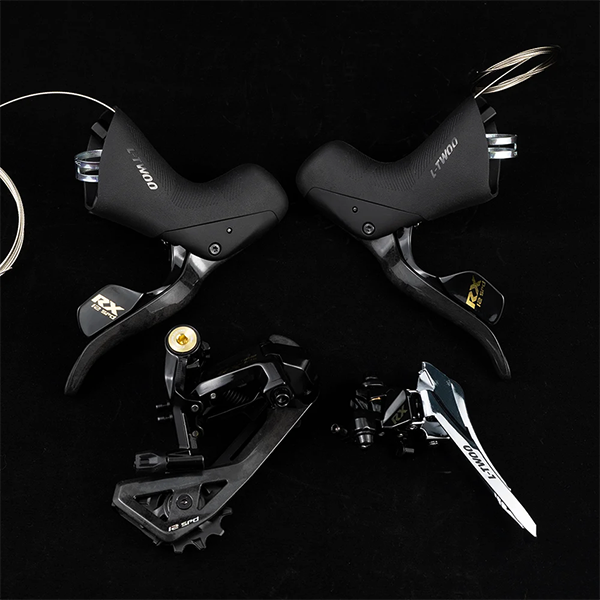
L-TWOO RX 12-speed mechanical groupset
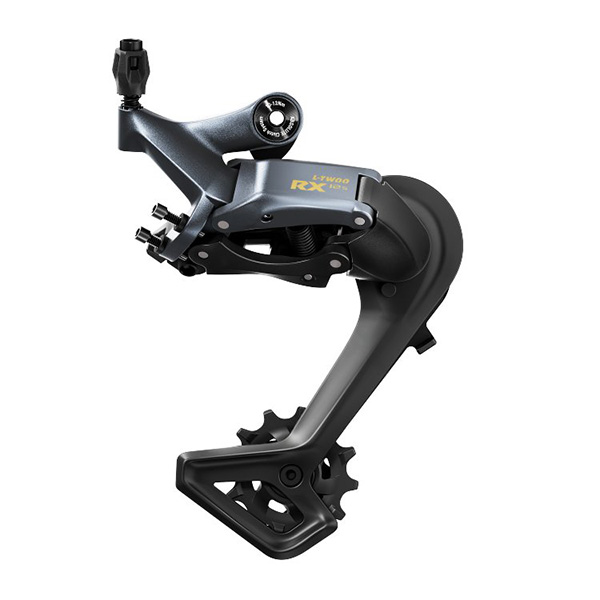
The RX series is L-TWOO’s flagship 12-speed road groupset. It uses mechanical cable-actuated shifting with hydraulic disc brakes.
I purchased the original RX R5010 release for $374.83, which included shifters, brake calipers, and front/rear derailleurs. Its shift logic follows Campagnolo, with a separate thumb lever. Since then, L-TWOO has released the R5012, which appears to have a more refined shape and finish, along with a Shimano-style shift option.
One thing to note: the cable pull ratio is compatible with Shimano 12-speed road derailleurs and cassettes, so it can be mixed with Shimano-compatible parts. It is also compatible with L-TWOO’s GRT rear derailleur, which opens up wider cassette options. Although the RX rear derailleur officially supports up to a 32T cassette, I am running a 34T cassette with no issues.
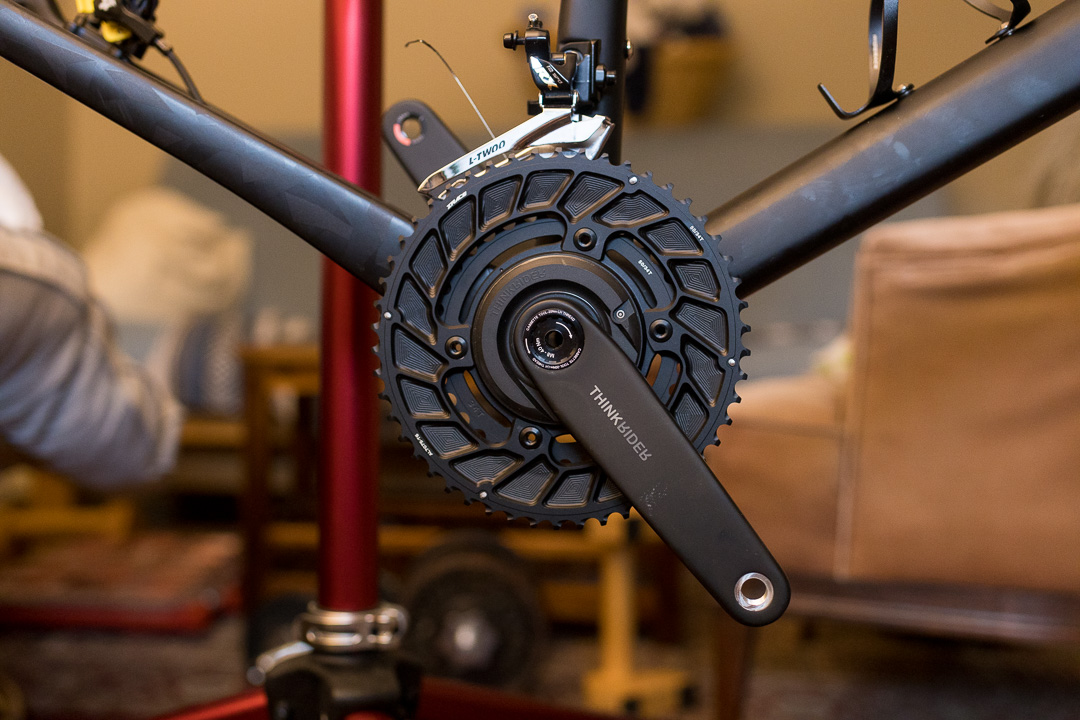
Crankset
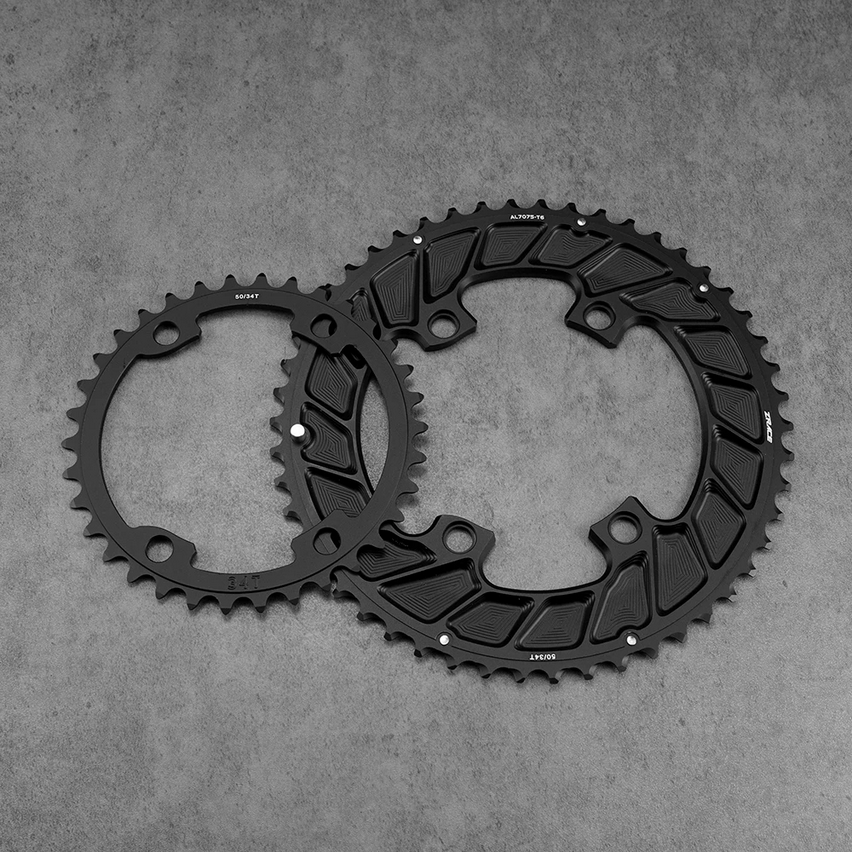
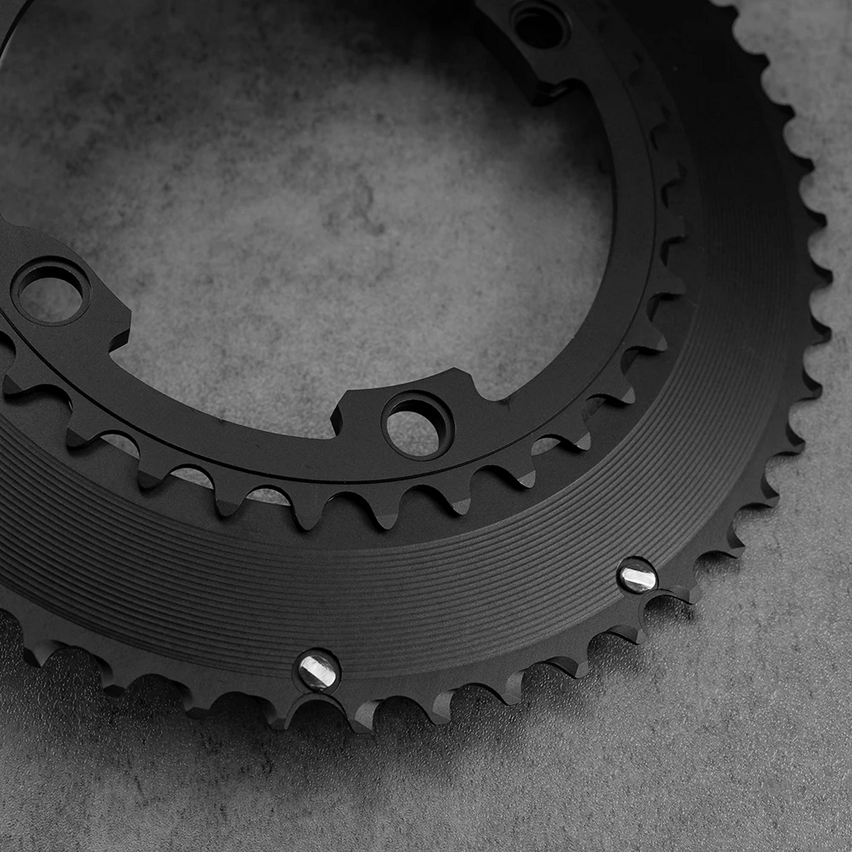
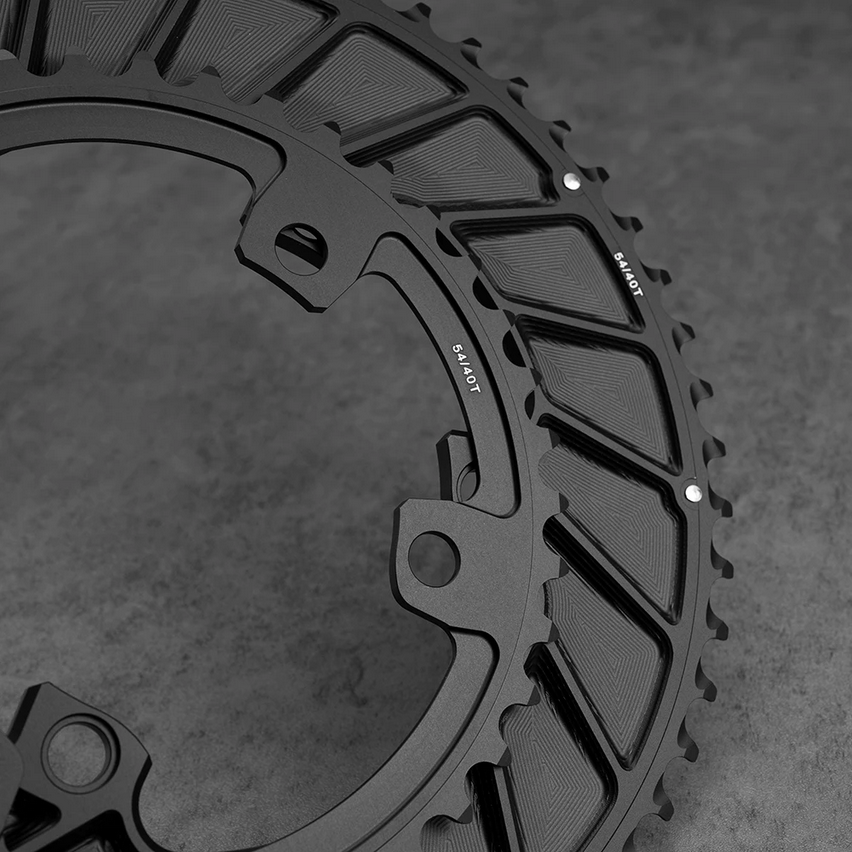
For the crank assembly, I used a ThinkRider PP5 spider-based power meter, 165mm carbon crank arms (24mm Shimano-standard titanium spindle), and ZRACE Unchained 50/34T chainrings. The PP5 uses an Easton-style four-bolt 110 BCD interface: the spider mounts to the drive-side crank arm, and the chainrings mount to the spider.
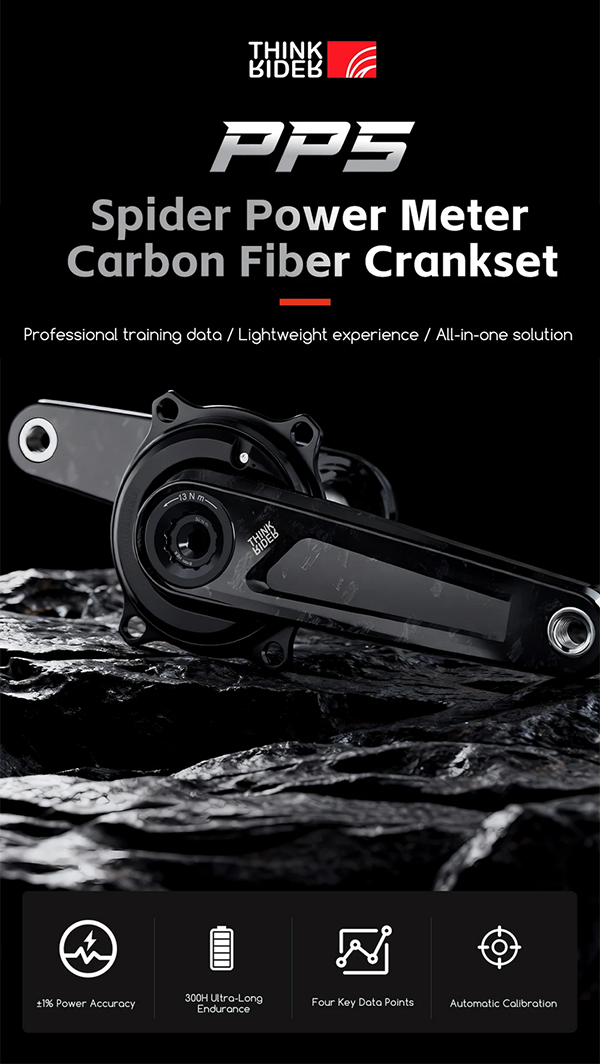
The appeal was mostly cost. The PP5 power meter spider itself is around $100, which was close enough to the cost of a non-power-meter spider that it seemed worth trying. The complete crank assembly, including the crank arms, was $252.09.
Shane Miller (GPLama) reviewed the PP5 power meter and found accuracy problems, especially after hard efforts where the zero offset can drift and make the unit read high for the rest of the ride. For my use, as a non-serious cyclist, having rough power reference sure beats vibes.
The chainring is a ZRACE Unchained 50/34T set. These are machined out of 7075 aluminium and are heavily profiled for weight reduction. The chainrings were $67.30.
Brakes
The original build out used L-TWOO RX hydraulic calipers which worked wonderfully, but I hated how they looked. I replaced them with ZRACE XG4 four-piston hydraulic calipers. Some L-TWOO RX groupsets are now sold with these calipers, but that option was not available when I bought mine.
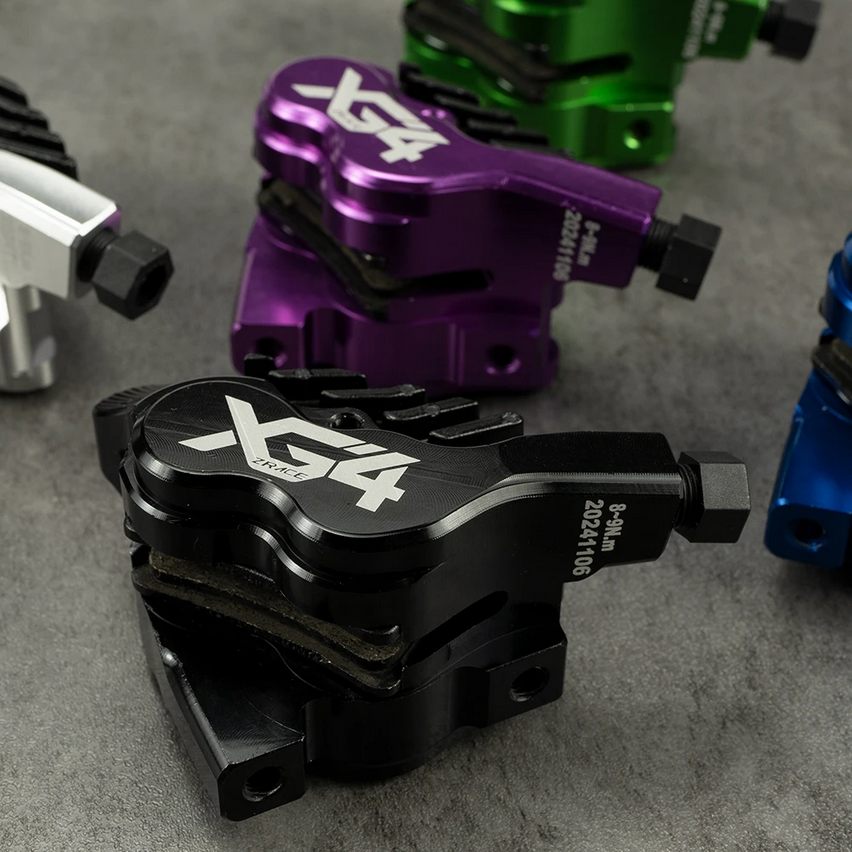
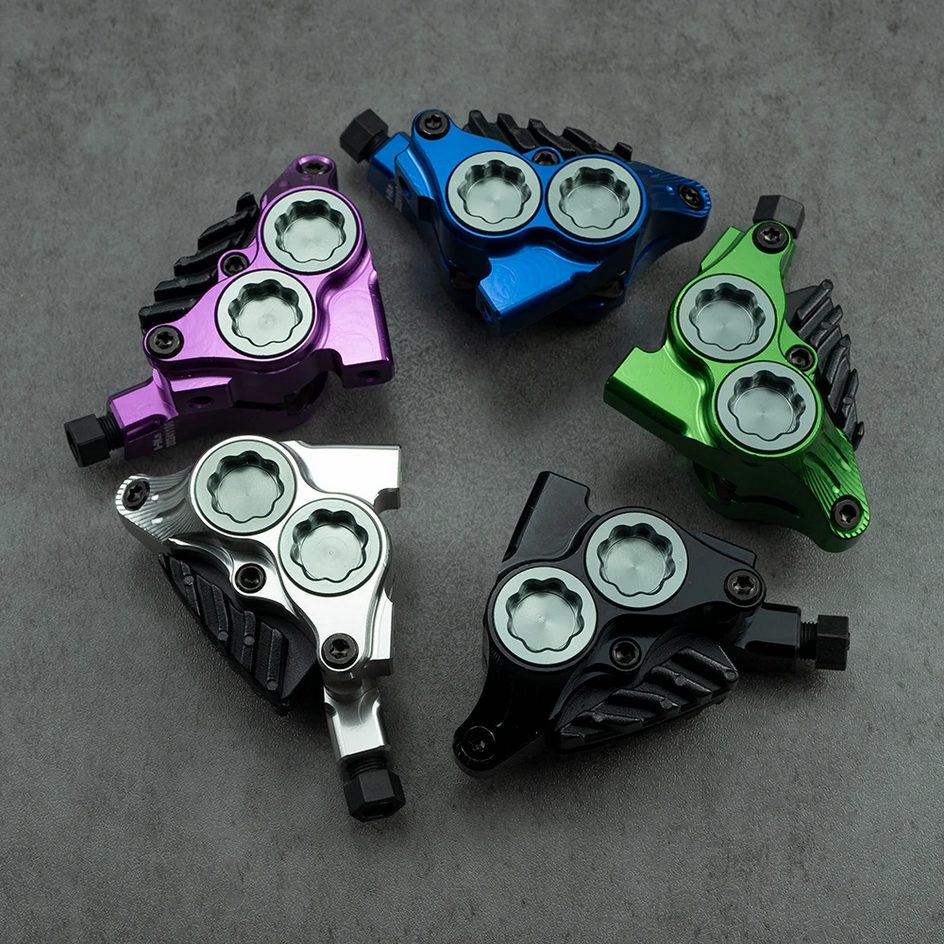
The calipers have a one-piece machined aluminium body with an anodized finish, and they feel very high quality in hand. ZRACE offers them in several colours, and the same calipers are also sold under brands like IIIPro and ONIRII with even more finish options. The design is heavily inspired by the Hope RX4 calipers and uses the same brake pads.
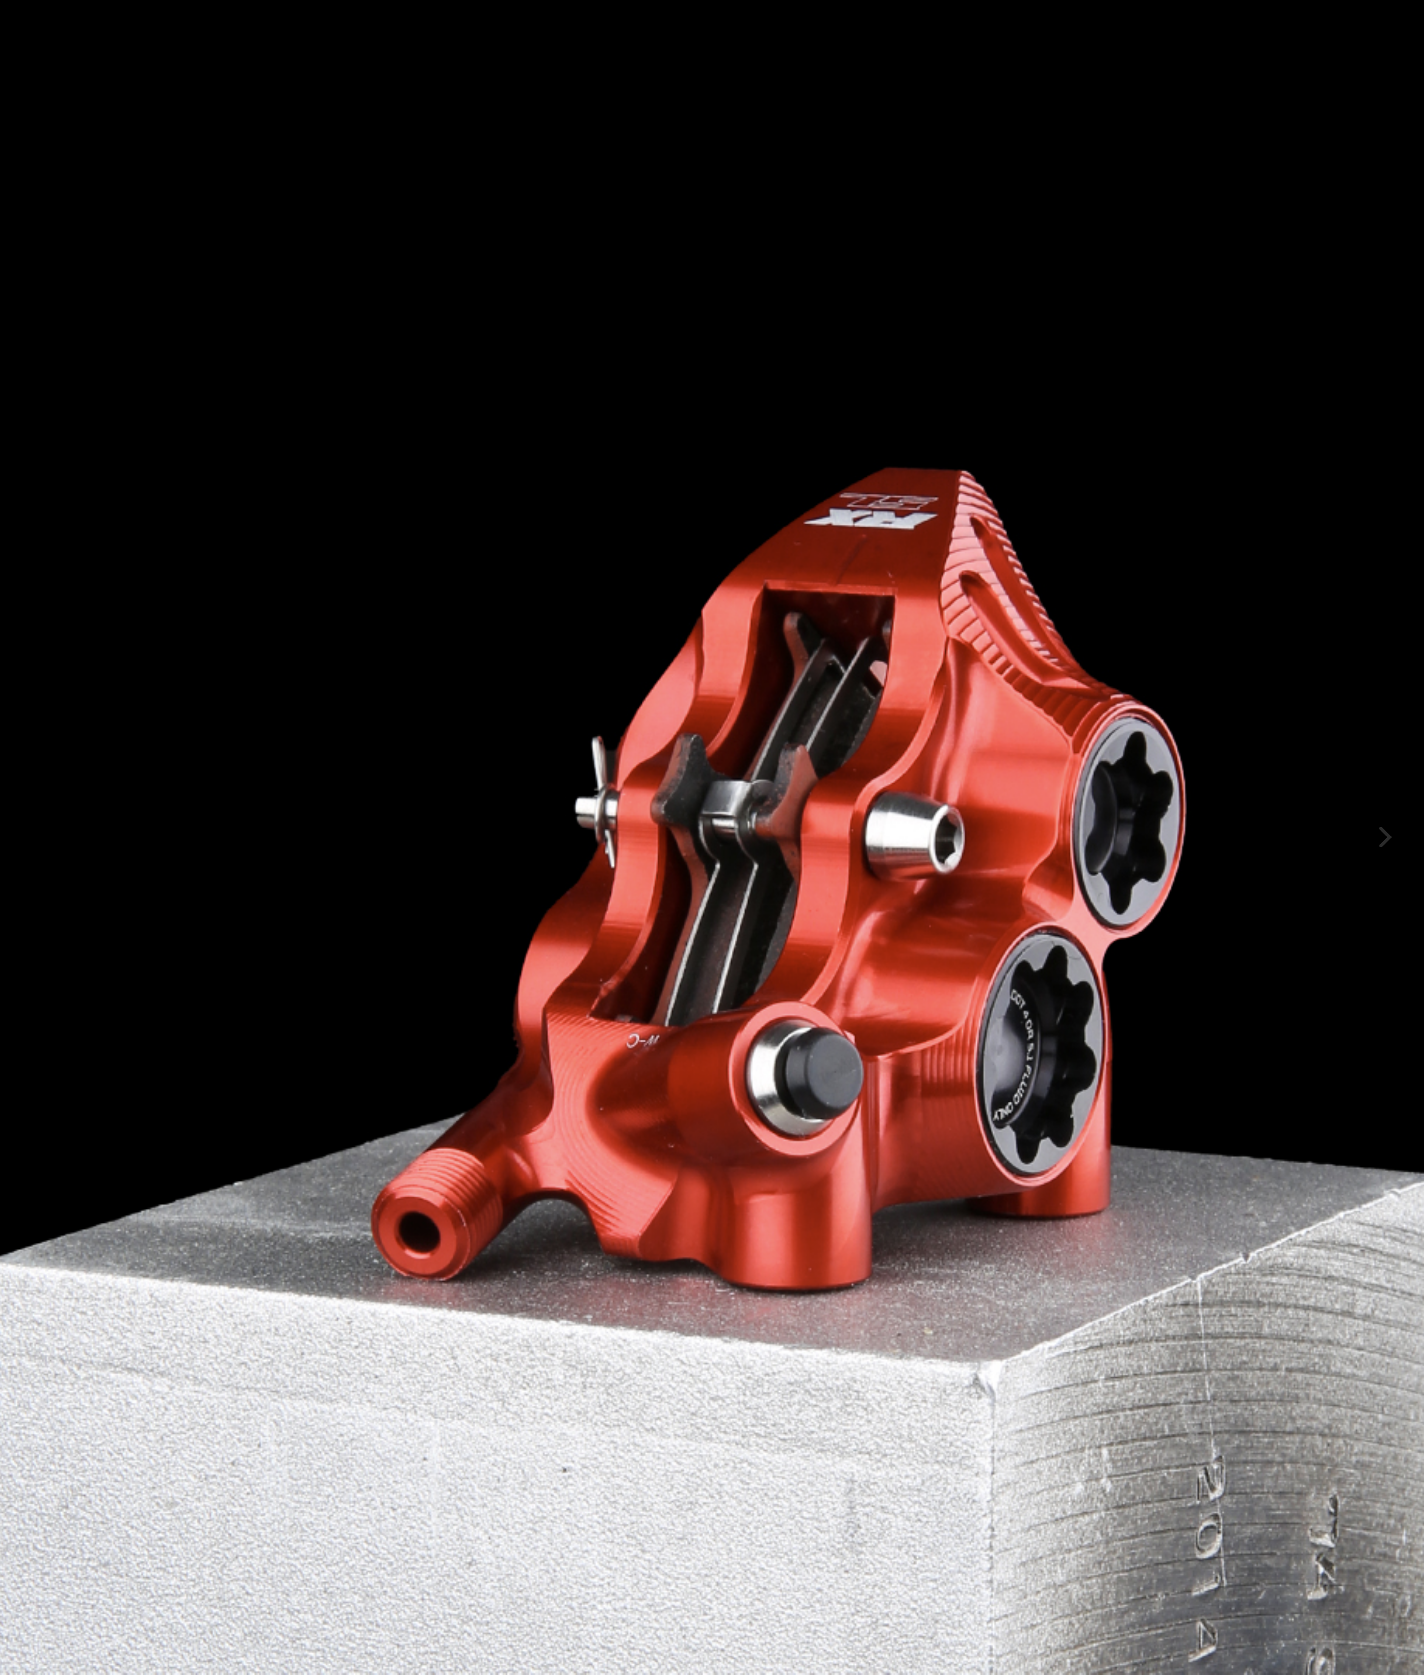
I paid $83.64 for the pair of calipers and $10.02 for the ZRACE 160mm centerlock disc rotors.
Cassette
I am using a ZRACE 12-speed 11-34T cassette. It is a very utilitarian cassette: the steel cogs are riveted together around an aluminium support structure. I paid $35.96.
Wheels
Elitewheels are no longer an obscure AliExpress wheel brand. Their higher-end Drive line is well regarded, but this build uses their entry-level ENT gravel wheels.
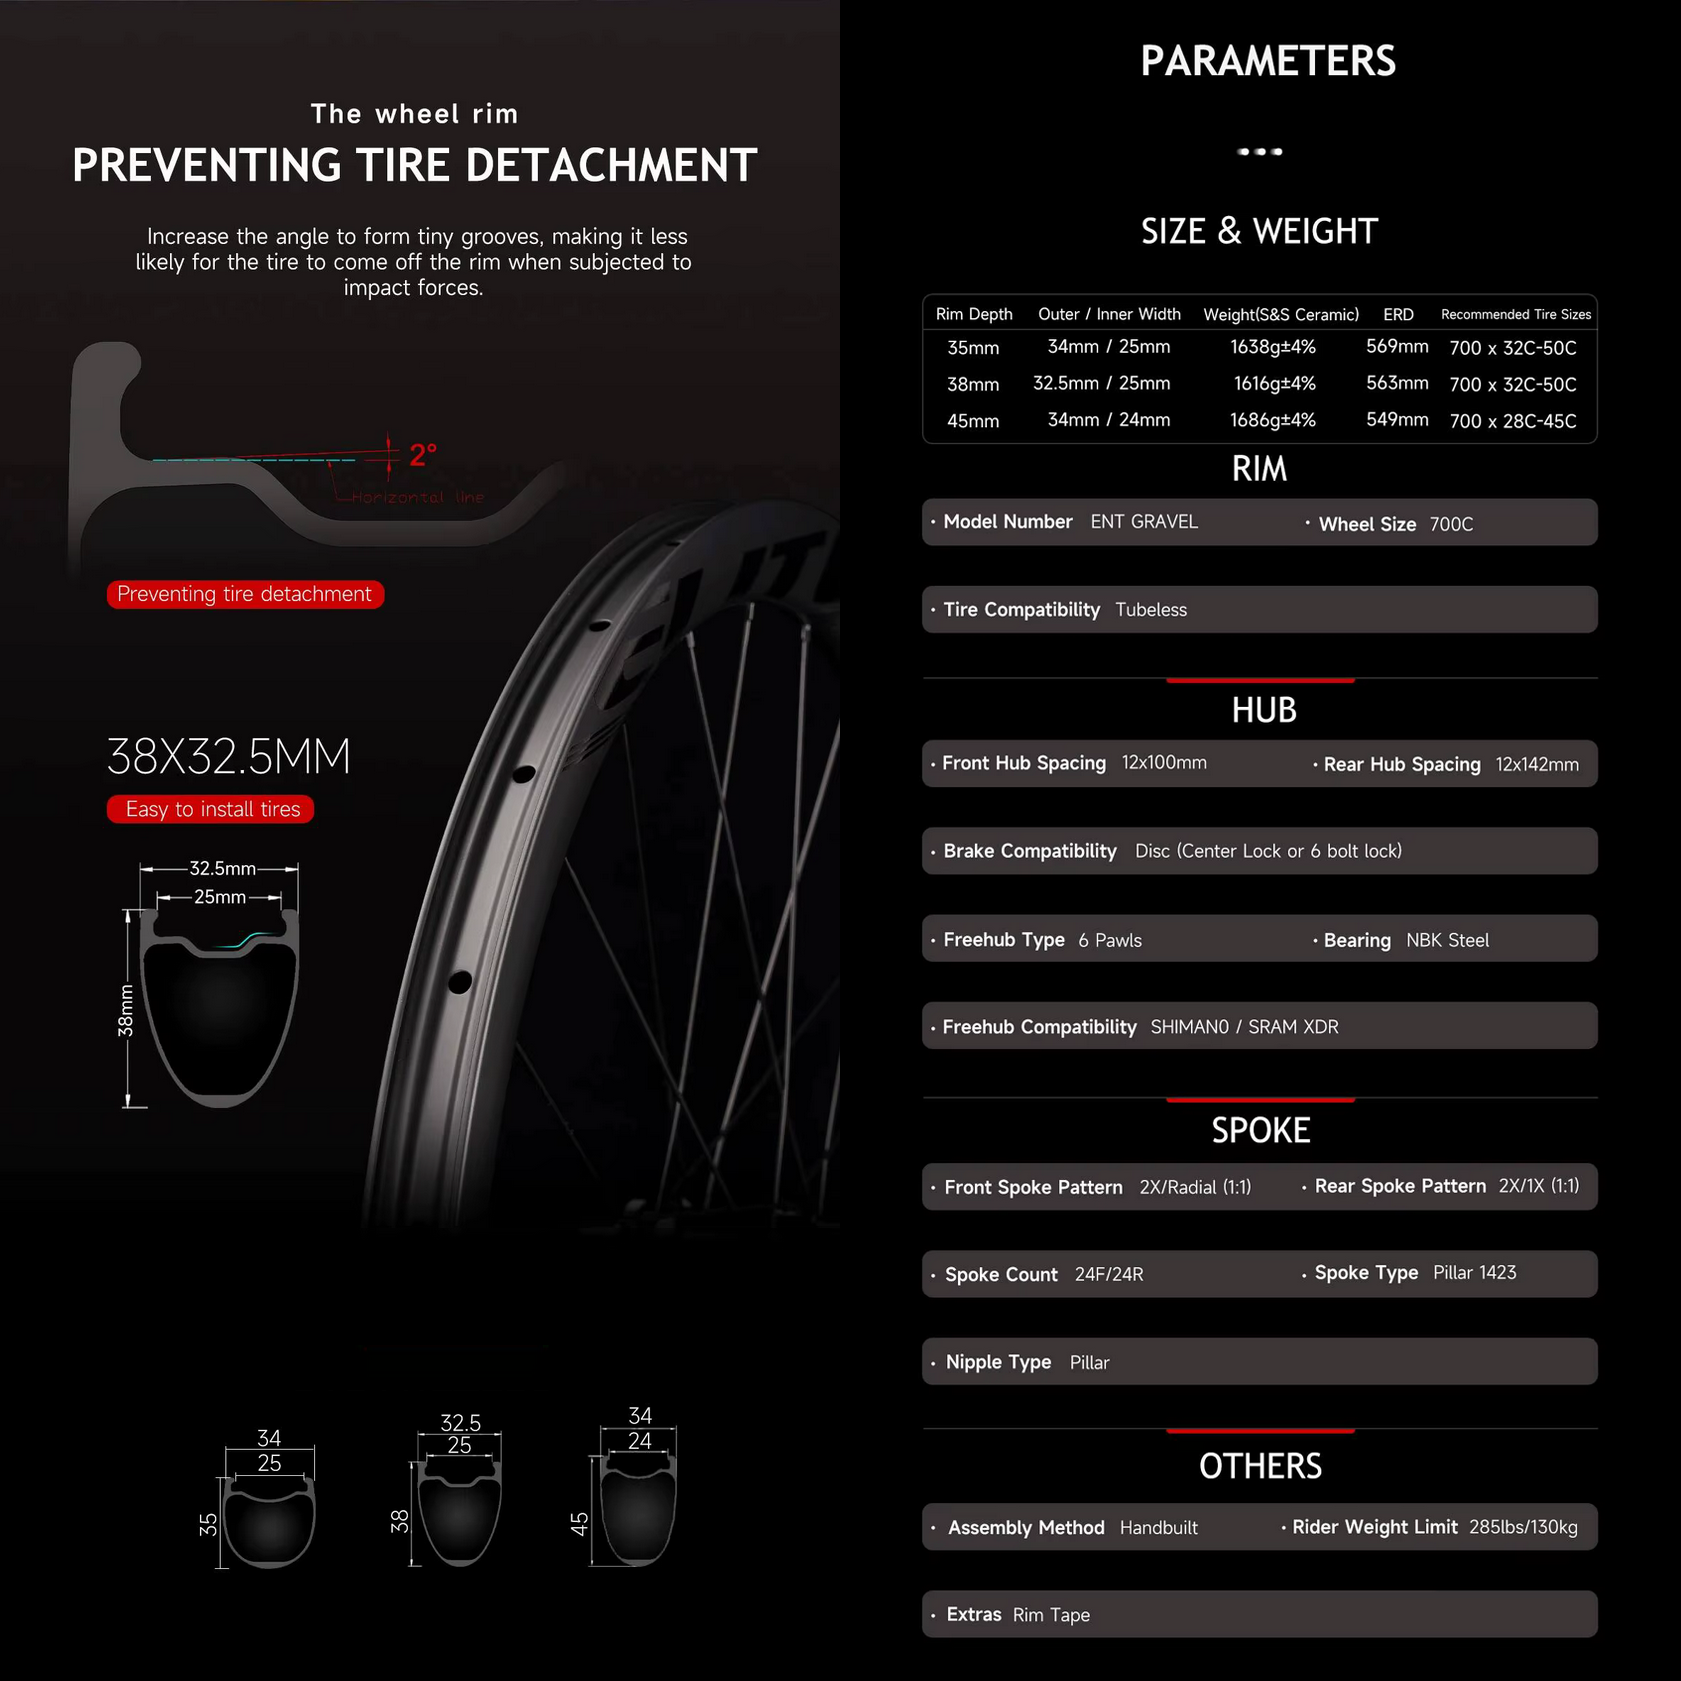
These are carbon gravel wheels with centerlock rotor mounts, basic aluminium hubs, and NBK bearings. I chose the gravel version because this build aspires to be for some light all-road use. My assumption was that a gravel wheelset would be less fragile than a lightweight road wheelset.
Other parts
Lizard Skins DSP bar tape
Fizik Arione VS saddle
Shimano SPD pedals
Assembly Notes
Bottom bracket
A bottom bracket is the bearing assembly that lets the crankset rotate inside the bicycle frame. It supports the crank spindle, carries pedaling loads from both legs, and transfers those loads into the frame while keeping the crank aligned and spinning smoothly. In practice, a bottom bracket is also an interface between the crank, the frame shell, and the manufacturing tolerances of both. Most bottom bracket problems come from that interface: how accurately the bearings are positioned, how securely the cups are held, and whether the frame shell distorts or misaligns the bearing seats.
The mechanical problem the bottom bracket is trying to solve is a mix of bearing alignment, shell tolerance, serviceability, and frame manufacturing tradeoffs. Different bottom bracket systems make different assumptions about where alignment comes from.
| Design | Main alignment datum |
|---|---|
| Separate left/right cups | The frame shell |
| Thread-together cups | Frame shell plus the threaded BB body |
| One-piece / cartridge-style BB | The machined BB unit itself |
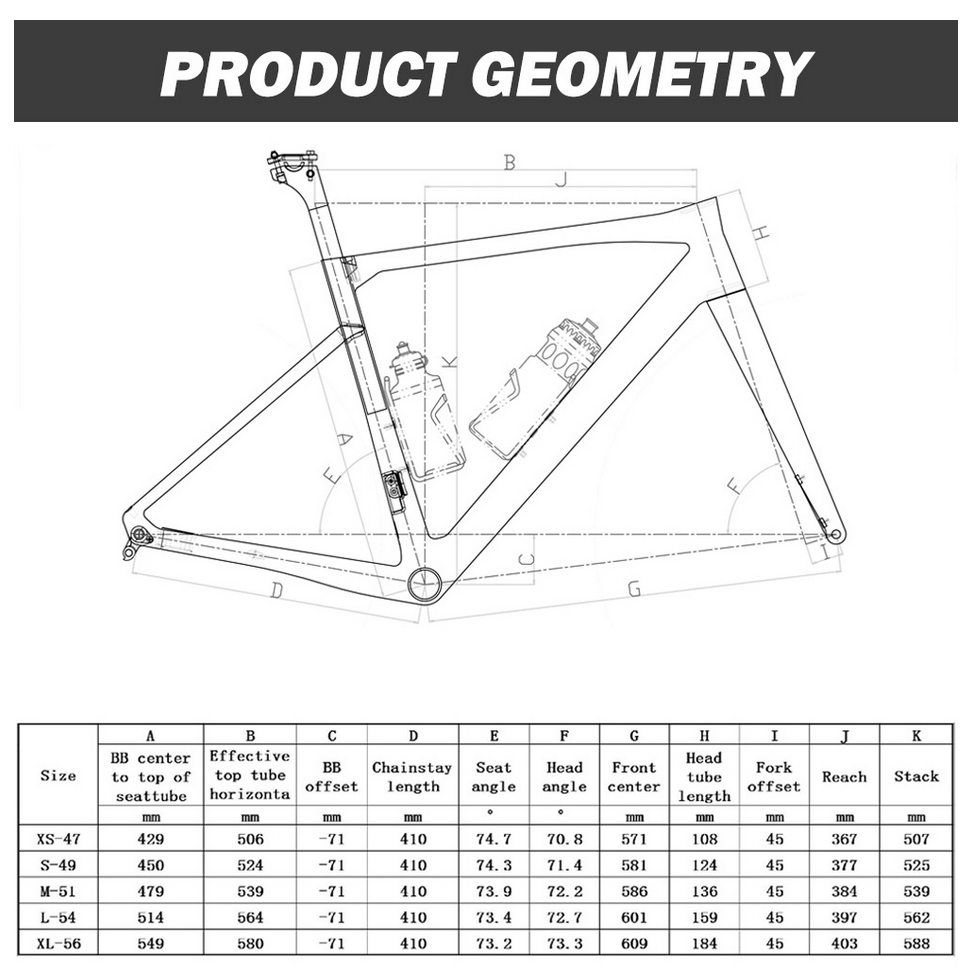
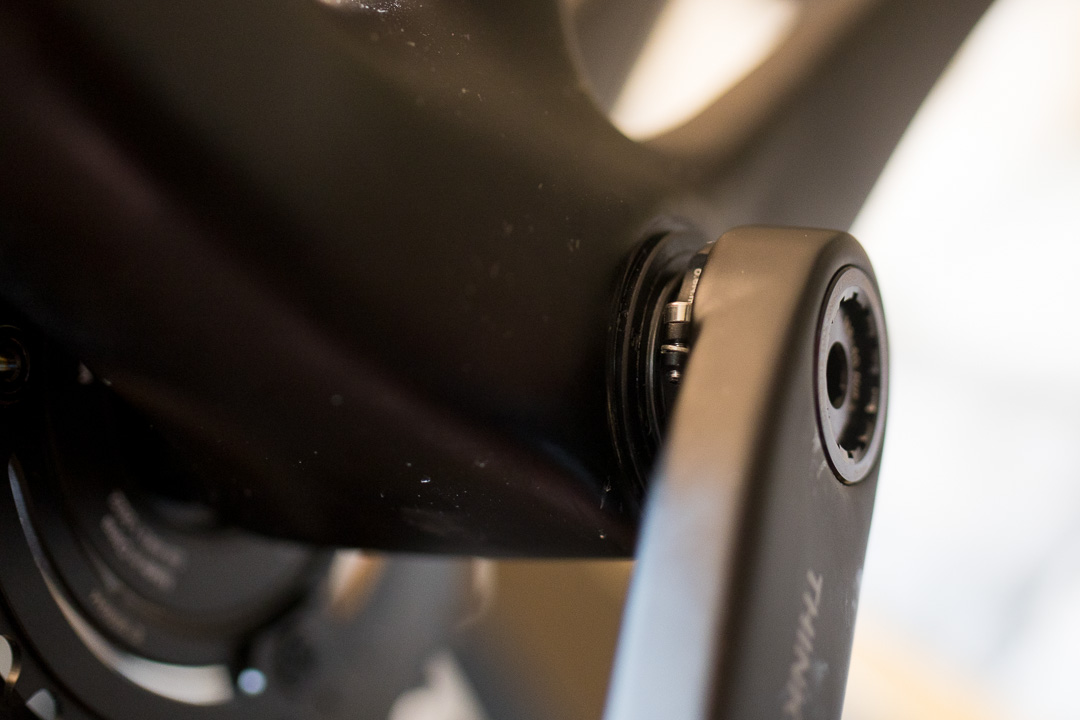
This frame is configured with a BB86 press-fit bottom bracket. BB86 uses a nominal 41mm inner diameter shell and an 86.5mm shell width.
In a standard BB86 setup, each cup is independently pressed into the frame. The frame shell determines where each bearing sits. This is attractive for carbon frame design because it avoids a threaded bottom bracket shell, allows a wide shell area, and can simplify the frame structure. The tradeoff is that the bottom bracket becomes highly dependent on the accuracy of the frame shell.
Separate press-fit cup systems assume the frame shell is:
- Correct diameter
- Round
- Coaxial side to side
- Properly faced / parallel
- Not locally tight enough to distort the cup or bearing
Forming press-fit apertures is probably pretty hard. Press-fit bottom brackets have a fairly negative reputation. Hambini Engineering argues that the standard itself is not inherently bad, the issue is that it relies heavily on frame manufacturing precision.
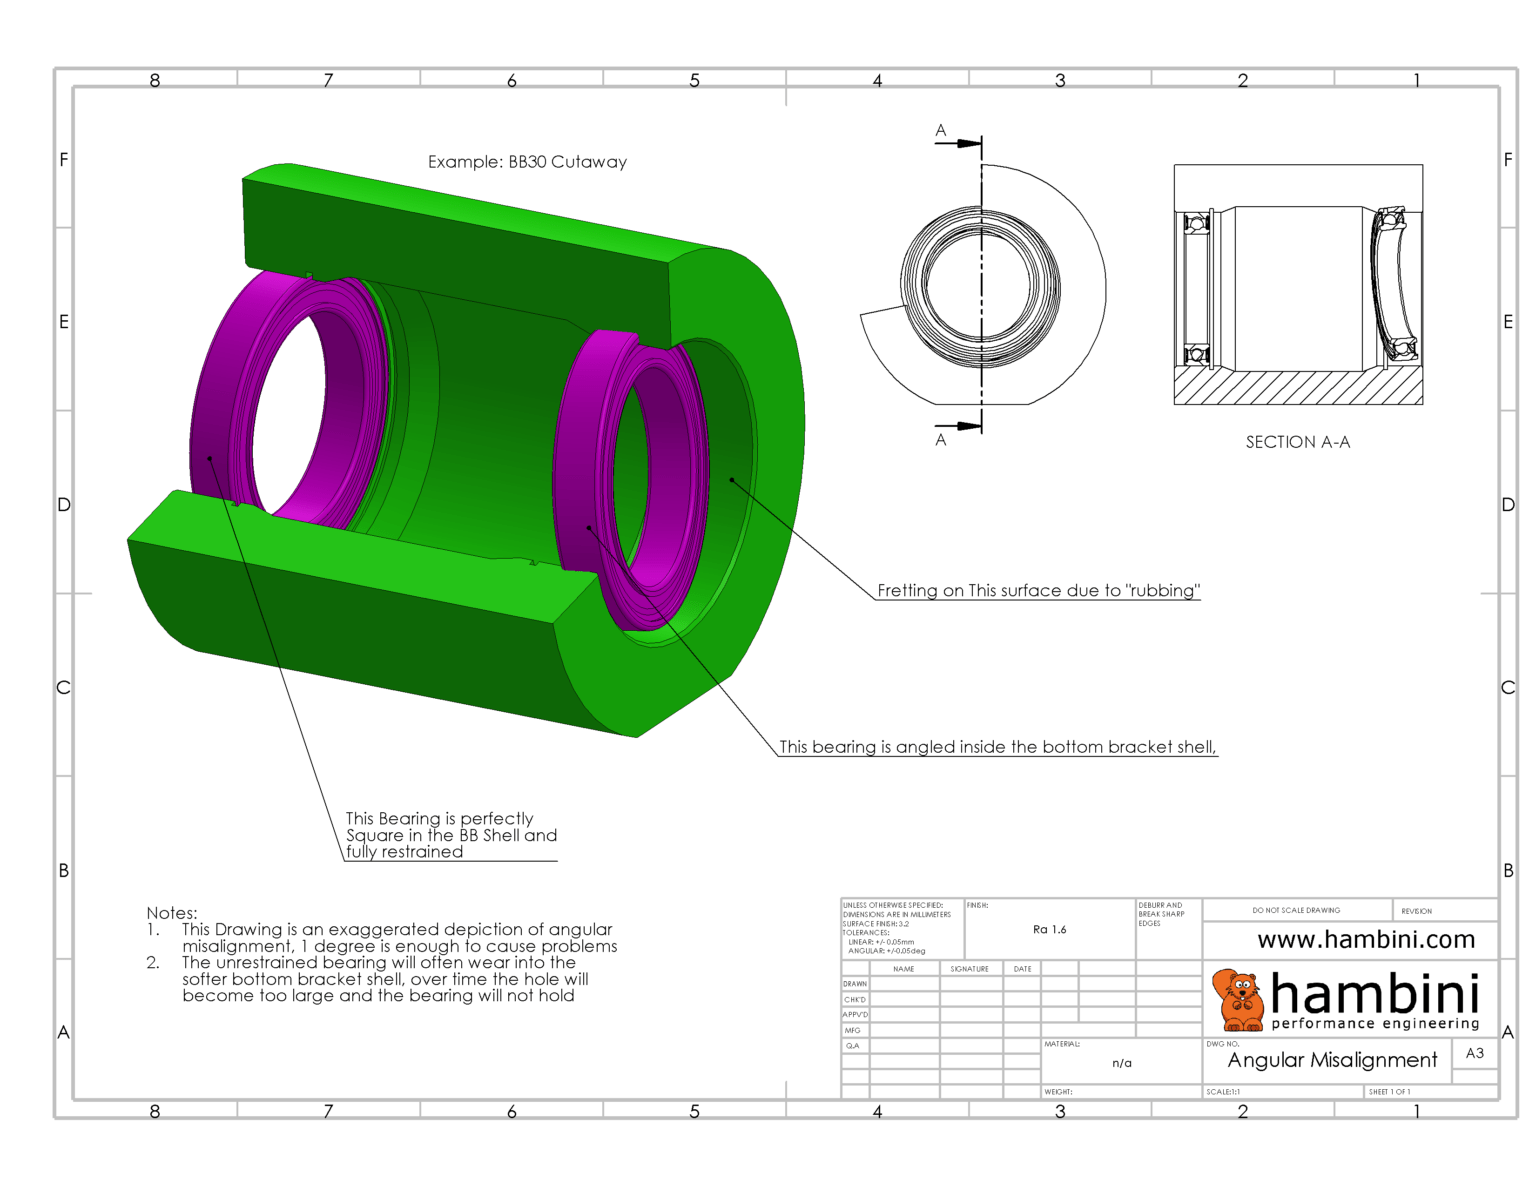
A common mitigation strategy is a thread-together press-fit bottom bracket. In this design, the cups still sit inside a press-fit shell, but the two sides thread into each other through the center. That turns two independent cups into a semi-joined assembly.
A thread-together bottom bracket mainly tries to solve two problems:
- Cups walking or moving independently
- Poor retention or creaking at the cup-frame interface
This can improve retention and may reduce creaking, but it does not automatically create a perfect independent bearing line. The frame shell still matters. If the shell is locally undersized or oval, the cup can still be squeezed and the bearing can still be distorted.
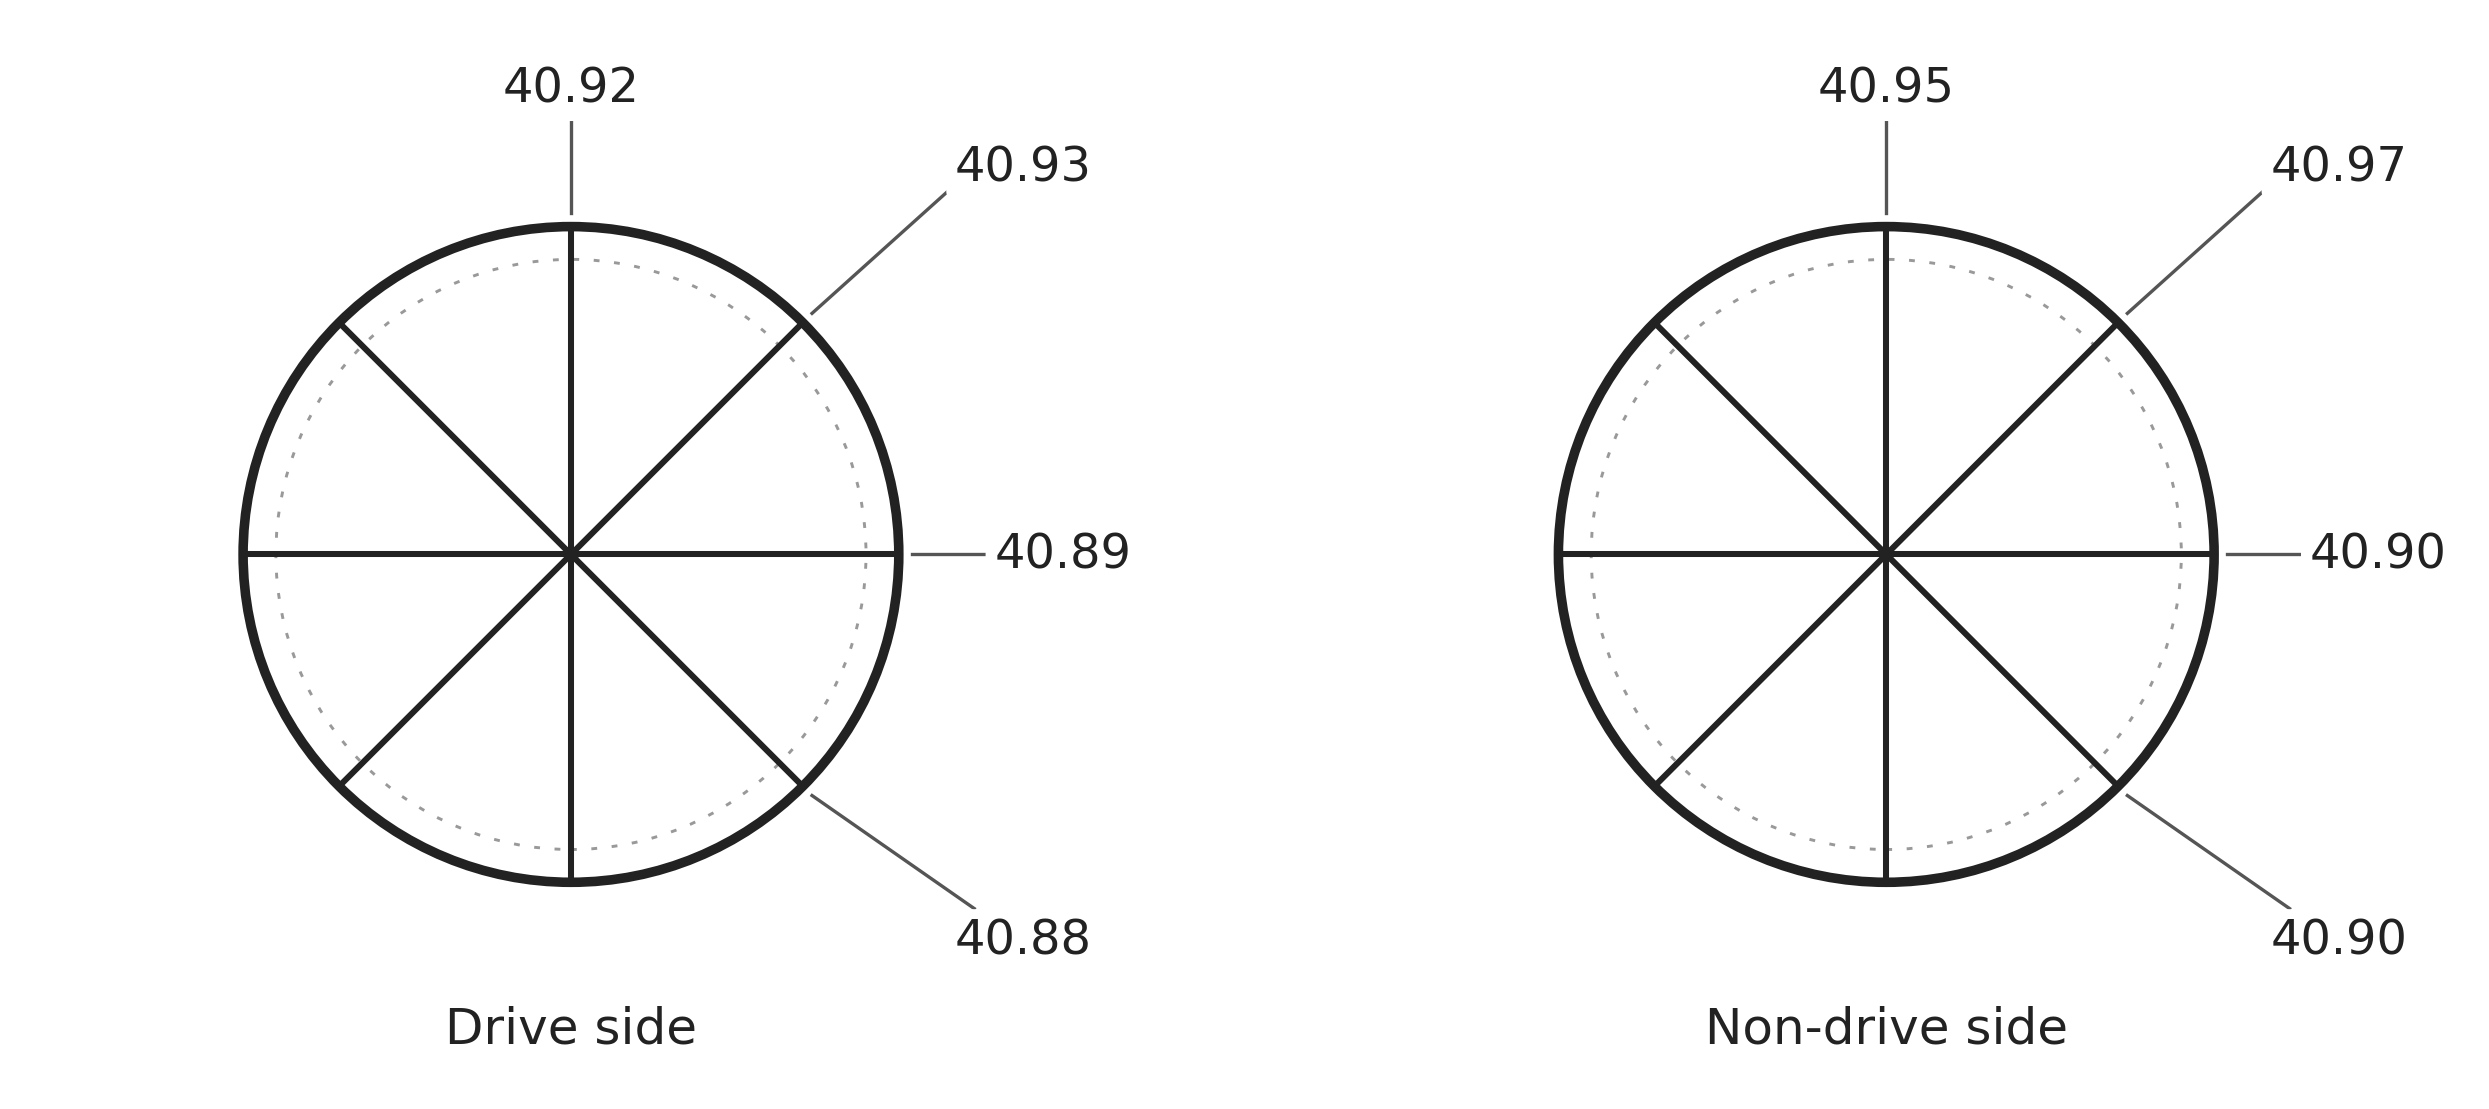
Nominally, a BB86 shell measures 41mm in diameter. Common fit guidance puts the acceptable bore range at approximately 40.95mm to 41.00mm.
I measured this shell with a digital caliper. These are reference measurements, but they are useful enough to compare against the symptom. Several areas measured below 40.95mm, especially on the drive side, suggesting that parts of the shell are undersized and possibly out of round.
Originally, I installed a thread-together press-fit bottom bracket, but the non-drive side bearing did not turn freely once installed, whereas the bearing felt fine outside the frame. That suggests the bearing or cup was being squeezed by the shell after installation. The likely issue is not just left/right alignment. Because the roughness appears even with one side installed, the stronger suspicion is local bore distortion: the shell may be undersized or oval enough to compress the cup or bearing race.

There are a few possible ways to respond:
- Leave it alone and treat the bottom bracket as a wear item.
- Try a different bottom bracket design that tolerates the shell better.
- Modify the bottom bracket cup slightly so it is not squeezed as much.
- Correct the frame shell.
Correcting the frame shell is the most direct fix, but it is also the most permanent and the easiest to get wrong without proper piloted tooling. A hand hone can remove material, but it will not reliably correct coaxial alignment, roundness, or parallelism. It can also make the shell oversized if used carelessly.
Modifying the bottom bracket cup is less risky because the cup is sacrificial and replaceable. It may reduce the interference fit enough to stop the bearing from being squeezed. However, that does not fix the underlying shell geometry.
Practically, the main implication is premature bottom bracket wear, small power loss and possible future creaking. Itself, that is not catastrophic, press-fit bottom brackets and bearings are replaceable wear parts. But it is still a useful quality signal of the overall frame.

I pursued an unsuccessful claim with AliExpress. The seller offered a refund on the frame, but I would have to pay return shipping, which would have cost more than the frame, so I decided to keep it. I think that’s a very appropriate outcome for having bought an alarmingly low priced carbon frame from an unknown company.
Headset
The expander plug in a carbon steerer acts as both the headset preload anchor and internal support for the stem clamp. The plug should extend through the full clamping zone so the stem compresses the steerer against a supported internal surface. If the plug is too short, positioned too high, or does not overlap the stem clamp, the stem can squeeze an unsupported section of carbon steerer. This can ovalize or locally crush the tube, creating a stress concentration. Under braking, steering, sprinting, or impact loads, that damaged area can crack and may eventually fail. Major brands have issued recalls or service fixes around this type of failure mode, including Specialized’s Tarmac SL7 extended-expander recall and Canyon’s Speedmax CF V21 Aerostem steerer reinforcement recall.
I replaced the original expander plug with a longer 55mm unit. The new plug extends past the full stem clamp zone and into the spacer stack. In general, a longer expander plug is beneficial when it properly fits the steerer, supports the full stem clamp, and does not interfere with routing or internal steerer geometry.
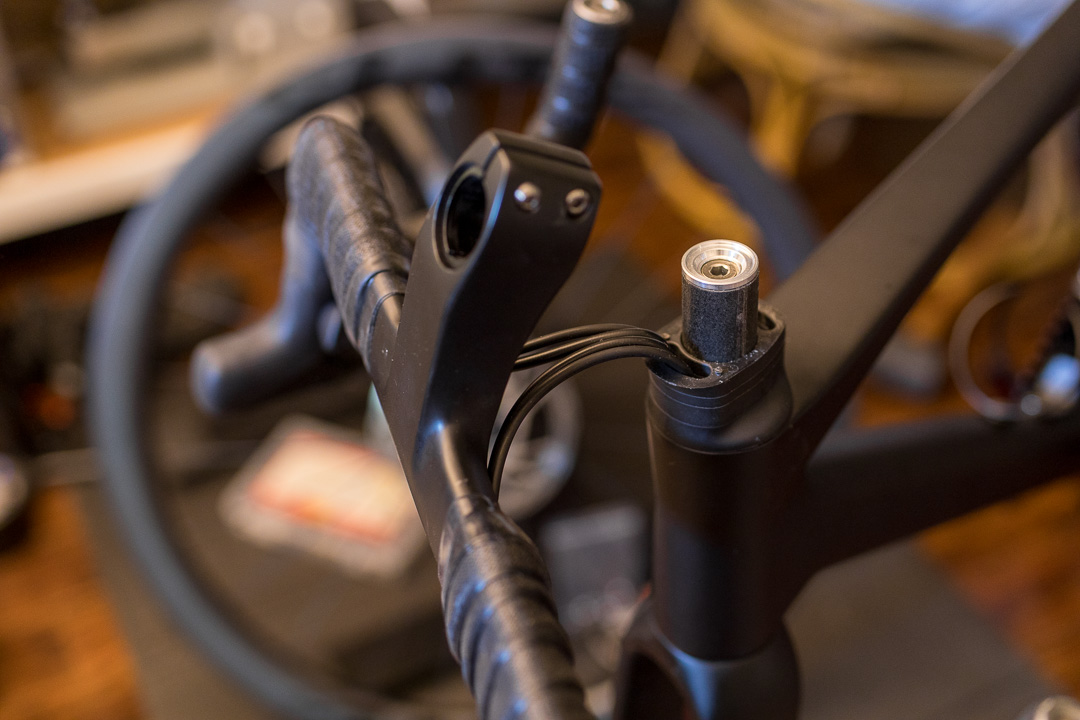
The area near the upper headset bearing is also highly loaded, but for a different reason. That region sees bending and bearing reaction loads as the fork transmits braking and road impacts into the head tube. The expander plug does not usually need to extend into the head tube itself. The more important requirement is that it supports the stem clamp area and that the spacer stack remains within the fork or frame manufacturer’s limit.
I cut the steerer tube approximately 1 to 2mm longer than ideal, so I added a 2mm spacer above the stem to allow proper headset compression.
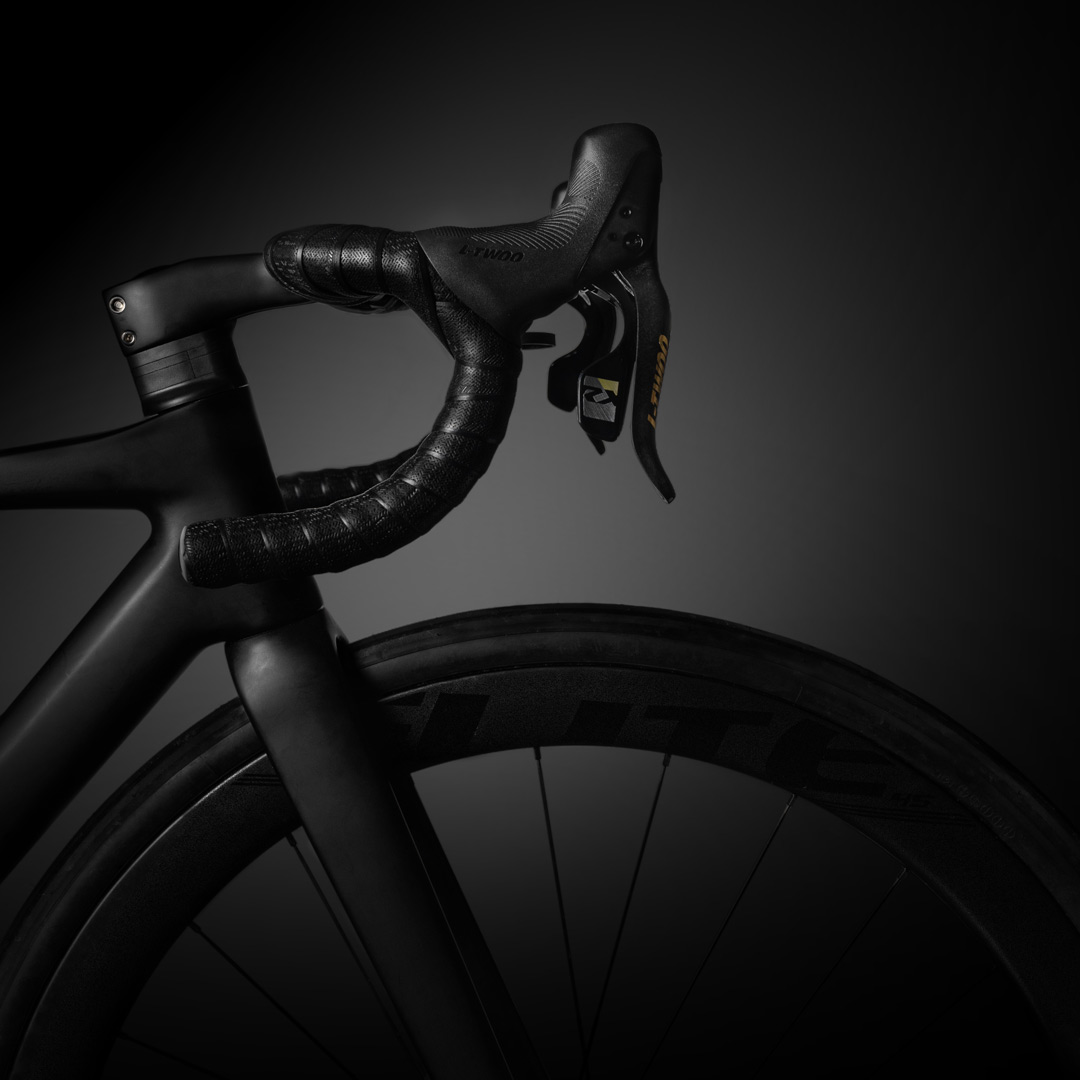
L-TWOO RX Groupset
Overall, I am very happy with the L-TWOO RX groupset. Long-term reliability is still to be determined, but so far the shifting has been as good as anything I have used. The shifter shape works well for my hands, the rubber hoods feel high quality and grippy, and I like the Campagnolo-style thumb lever.
The shifting is snappy, though I do think this needs some context: a well-maintained and properly indexed mechanical groupset should shift well. The more noticeable differences are in refinement. There is a small amount of free play before the shift lever engages. It is not mushy, but there is some slop, and it is noticeable compared with higher-end groupsets. The thumb lever appears to be nylon, and the shift paddle is some sort of plastic. They work fine, but they are obvious places where the feel could be improved.
On my version, the brake levers are forged carbon fiber, though the standard version has aluminium levers. The pre-travel adjustment (which comes up again later with bleeding) allows one to fine-tune the responsiveness of the brakes.
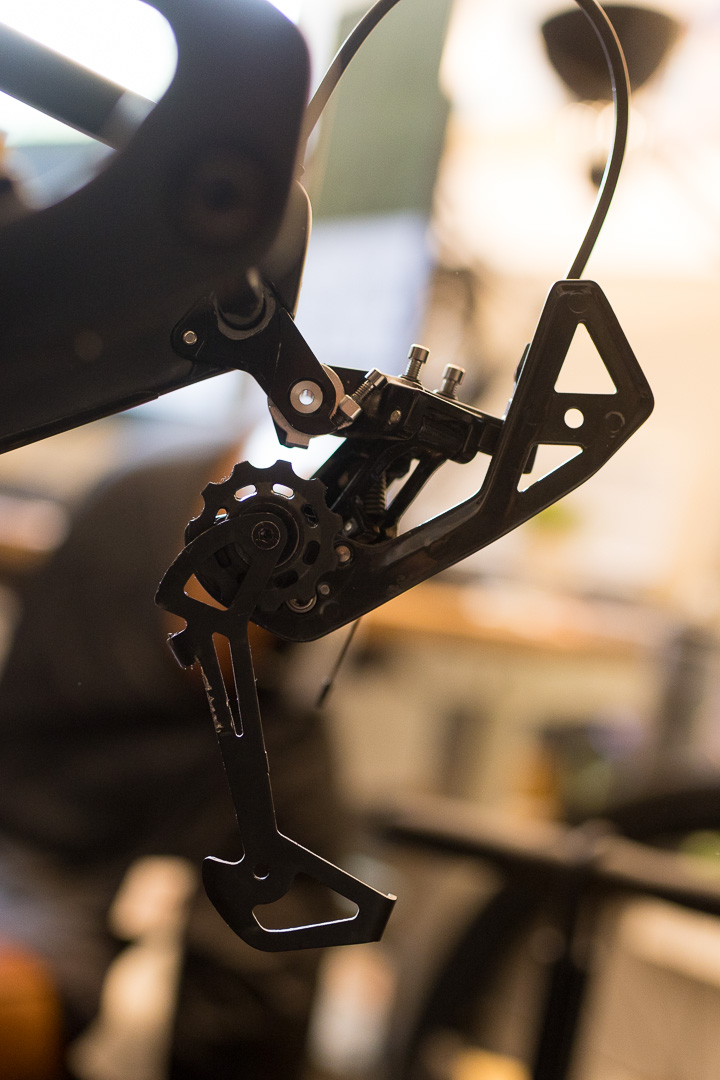
The derailleurs are less exciting than the shifters. Functionally, they’re fine, but just a bit pedestrian. I replaced the high/low limit, adjustment, and pinch bolt screws because the fasteners felt cheap.
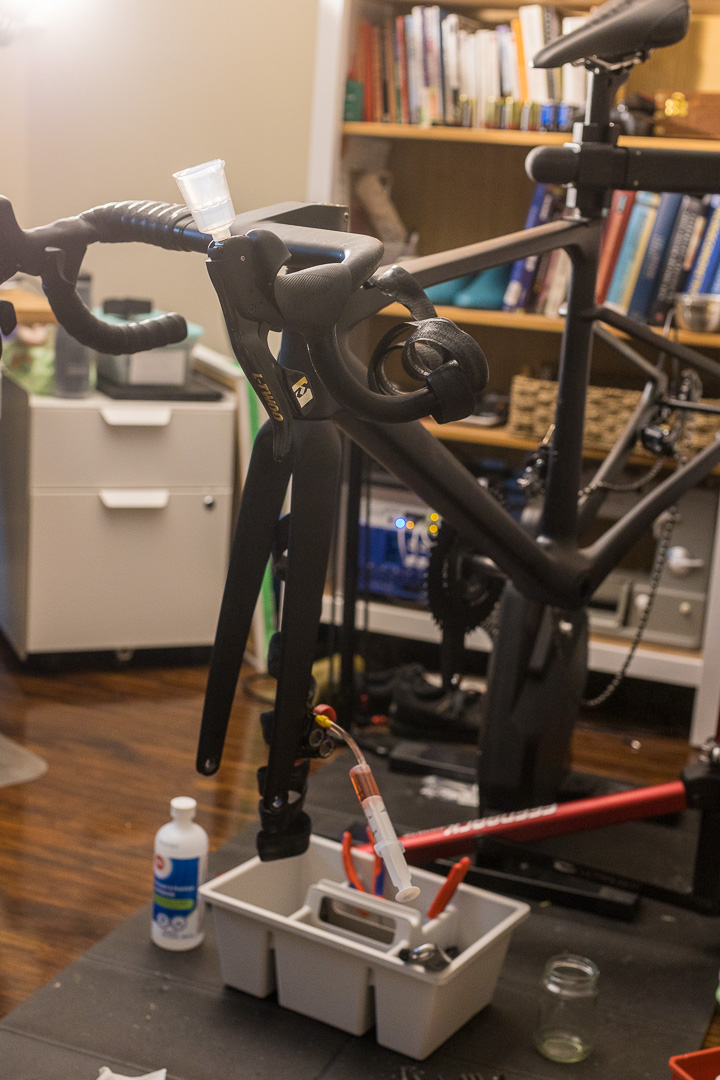
Mechanically, installation was straightforward. The only part that was new to me was setting up and bleeding hydraulic road brakes.
Installing the groupset was straightforward, except there were two things new to me:
- Routing fully internal cables
- Installing hydraulic brakes
With routing tools, magnets, and gravity, routing the cable housing and hydraulic hoses was easy. The result is very clean, but the tradeoff is serviceability. Because the lines run through the handlebar and stem spacers, many future changes require pulling and rerouting them, including changing stem height, servicing the headset, or replacing the handlebar.
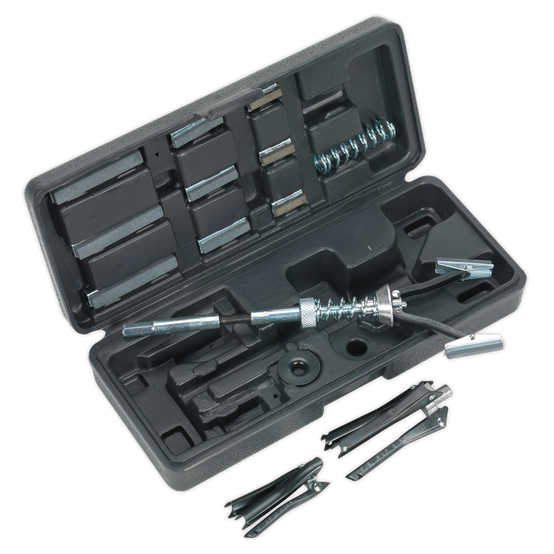
Installing hydraulic brakes was a bit more work. The manual provides guidance.
One detail worth emphasizing: the pre-travel screw on the shift lever needs to be backed out before bleeding. It does not need to be backed out all the way, but it does need to be open enough for the bleed procedure to work properly.
Bleeding the brakes means pushing mineral oil through the system while giving trapped air a way out. I used a syringe at the caliper to push oil upward, with a reservoir cup installed at the shifter bleed port.
Before bleeding, I removed the wheels and brake pads to avoid contaminating the braking surfaces, and installed a bleed block in the caliper. The bleed block keeps the pistons from moving too far out and sets the correct pad spacing while the system is open.
Once oil was pushed through the line and into the reservoir cup, I closed the caliper bleed port. Then I cycled the brake lever and rotated the shifter through a few angles to help trapped bubbles move up into the cup. The goal is to remove air from the system, since air compresses and mineral oil effectively does not.
Crankset
The crank arms are torqued to the spindle and retained in place via a larger reverse-thread bolt and lockring. Preload is set using a threaded collar on the non-drive side.
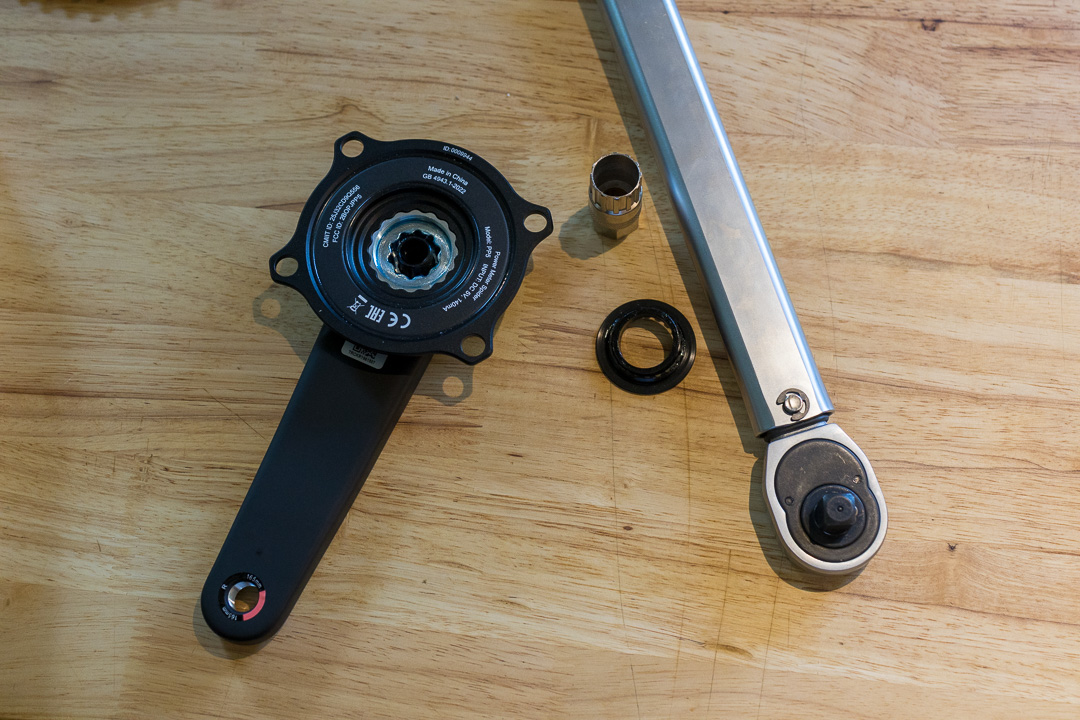
Here’s how that all looks like:
The crank uses a 95mm spindle. With the bottom bracket installed, the frame measured 91.5mm from cup to cup, leaving 3.5mm of total spacing to account for. I used 1.7mm of spacers on the drive side and 1.5mm on the non-drive side, then used the preload adjuster to take up the remaining difference. I applied Park Tool ASC-1 anti-seize compound to the splined and threaded interfaces during assembly.
Four chainring bolts are titanium bolts threading into titanium nuts. This is a high cyclic-load area, so retention matters more than easy future disassembly. Titanium-on-titanium galling is still a concern, but mostly during installation or removal rather than normal riding. Stainless steel bolts probably would have been the more sensible choice here. I used medium-strength threadlocker, prioritizing bolt retention over maximum anti-galling protection.
For future reference, here is the manual for the Thinkrider PP5 power meter.
Gearing
This is a compact 50/34T crankset paired with an 11-34T cassette. The result is a wide but conventional road/all-road range: a 4.55 top gear for fast descents or tailwinds, and a 1:1 lowest gear for climbing.
| Combination | Gear ratio | Speed (km/h) |
|---|---|---|
| 34 x 11 | 3.09 | 39.6 |
| 34 x 13 | 2.62 | 33.5 |
| 34 x 15 | 2.27 | 29.0 |
| 34 x 17 | 2.00 | 25.6 |
| 34 x 19 | 1.79 | 23.0 |
| 34 x 21 | 1.62 | 20.7 |
| 34 x 23 | 1.48 | 18.9 |
| 34 x 25 | 1.36 | 17.4 |
| 34 x 27 | 1.26 | 16.1 |
| 34 x 30 | 1.13 | 14.5 |
| 34 x 34 | 1.00 | 12.8 |
| 50 x 11 | 4.55 | 58.3 |
| 50 x 13 | 3.85 | 49.3 |
| 50 x 15 | 3.33 | 42.7 |
| 50 x 17 | 2.94 | 37.7 |
| 50 x 19 | 2.63 | 33.7 |
| 50 x 21 | 2.38 | 30.5 |
| 50 x 23 | 2.17 | 27.9 |
| 50 x 25 | 2.00 | 25.6 |
| 50 x 27 | 1.85 | 23.7 |
| 50 x 30 | 1.67 | 21.4 |
| 50 x 34 | 1.47 | 18.8 |
Coming from a 10-speed, I don’t see the benefit of 12-speed. Mechanically, 12-speed uses a thinner chain and narrower spacing between cassette cogs which in theory should be more fragile, and harder to index. I had no issues with locking in the indexing.
What I would value is wider gearing. Since the L-TWOO RX cable pull length is compatible with Shimano 12-speed and L-TWOO gravel groupsets, it is possible to use a long cage derailleur with a larger cassette. I may explore this later.
Fasteners and Torque
Bikes are exposed to water, sweat, road salt, grit, and repeated washing. Internal parts usually have some protection from seals, grease, or assembly compounds, but external fastener heads are much more exposed. Rusty fasteners bother me a lot, they make an otherwise well-maintained bike look neglected.
My original plan was to replace all the screws with 316 stainless steel. The problem was buying them in sensible quantities. I needed several sizes, lengths, and head types, and most suppliers sold them in packs of 50 to 100.
So I ended up sourcing specialty titanium fasteners from AliExpress. I do not care about the weight savings, but I like titanium, I strongly prefer Torx heads, and I did not want hundreds of spare screws sitting around. So paying silly prices for titanium screws was justifiably practical.
Using titanium fasteners also means paying attention to what they thread into. This bike has a mix of titanium, aluminium, steel, and metal inserts bonded into carbon parts. Mixed-metal joints bring two main risks: galling and corrosion.
- Galling: metal-to-metal adhesion under pressure. Threads feel rough, bind, then can tear or seize. Titanium and aluminium are more prone than plain steel.
- Corrosion: chemical/electrochemical attack. Mixed metals can create galvanic corrosion, especially with water/salt. Aluminium usually loses that fight against steel or titanium.
This table is a simple reference for static threaded metal joints on the bike. It compares common metal pairings and the relative risk of galling or corrosion with anti-seize, threadlocker, or dry assembly.
| Metal Pair | Anti-Seize/ Grease | Threadlocker | Dry |
|---|---|---|---|
| Aluminium, aluminium | Galling: low Corrosion: low |
Galling: medium Corrosion: low |
Galling: high Corrosion: medium |
| Aluminium, titanium | Galling: low Corrosion: low to medium |
Galling: medium Corrosion: medium |
Galling: high Corrosion: high |
| Aluminium, steel | Galling: low Corrosion: low to medium |
Galling: low Corrosion: low to medium |
Galling: low to medium Corrosion: high |
| Titanium, titanium | Galling: low Corrosion: low |
Galling: medium Corrosion: low |
Galling: high Corrosion: low |
| Titanium, steel | Galling: low Corrosion: low |
Galling: low to medium Corrosion: low |
Galling: medium to high Corrosion: medium |
| Steel, steel | Galling: low Corrosion: low |
Galling: low Corrosion: low |
Galling: low to medium Corrosion: medium to high |
Tube or tubeless?
I tried tubeless first. Setup was not as bad as its reputation suggested, and riding tubeless was genuinely amazing. Being able to run lower pressure without worrying about pinch flats made the bike feel more comfortable and more capable on rough surfaces.
The problem was storage and maintenance. I do not ride this bike consistently year-round, and tubeless sealant does not like sitting. It dries out, congeals, and can pool at the bottom of the tire, which makes the wheel feel unbalanced. You can remove the sealant before long storage, but at that point the convenience starts to disappear.
I am trying TPU tubes now.
Chain waxing
Chain waxing promises a clean, grime-free drivetrain. I was starting with a drivetrain that already had a few hundred kilometers on it, so the main work was stripping out old oil and contamination before waxing. The chain and cassette both fit in my 2L ultrasonic cleaner. The jockey wheels on the rear derailleur use press-fit bearings and I wasn’t prepared to replace them, so I manually cleaned those.
I first ran the cassette and chain for an hour at 50 degrees Celsius in Simple Green Aircraft diluted 50%. To keep the cleaner itself cleaner, I put the parts and degreaser in a Ziploc bag, then placed the bag in the ultrasonic bath with water around it. After that, I rinsed and dried the parts.
For the chain, I followed with an acetone cleaning step: an overnight soak in 100% acetone in a glass jar, then repeated wipe-downs until the chain stopped leaving residue. I also ran the chain in acetone in the ultrasonic cleaner, using a closed glass jar sitting in the water bath.
For wax, I used Silca Secret Chain Blend, which is paraffin wax with tungsten disulfide (link to SDS) and other additives. The wax comes in a sous-vide bag, which I heated in the ultrasonic cleaner set to 75 degrees Celsius. The cleaner could not actually reach that temperature; after about 1.5 hours it topped out around 67 degrees Celsius, likely because the bag did not fully fit in the vessel and the lid could not close properly.
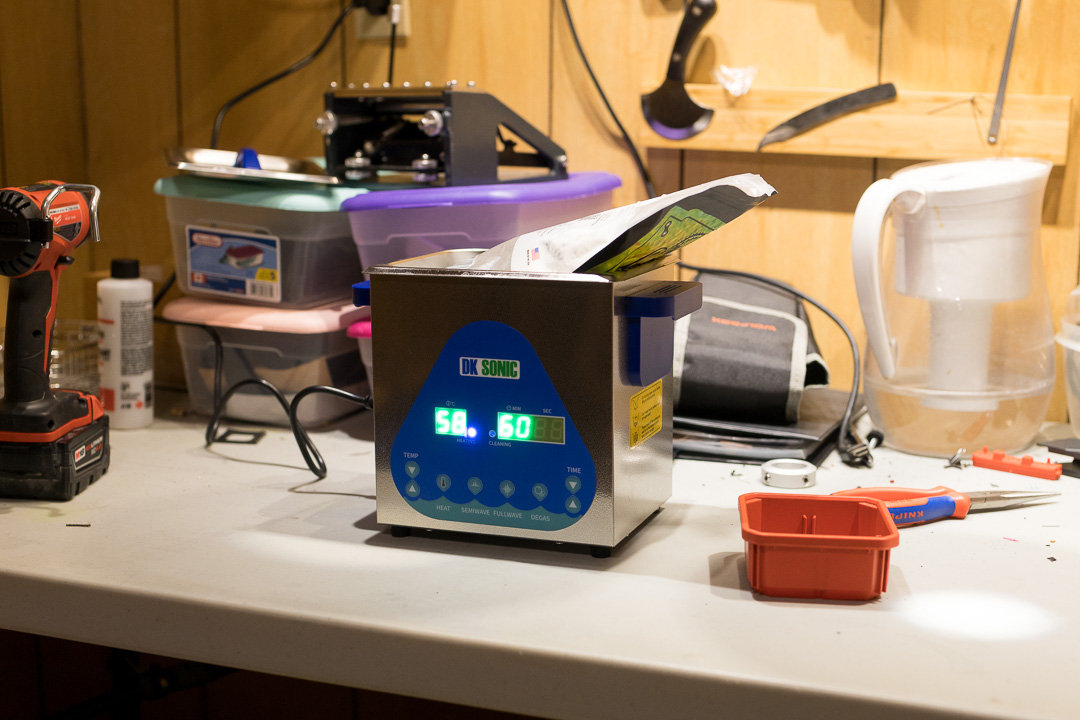
Measured with an IR thermometer, the wax appeared melted around 63 degrees Celsius. An IR thermometer is not ideal, so temperatures are approximate guidance. There was still a large unmelted clump in the center of the bag, but enough wax had liquefied to use.
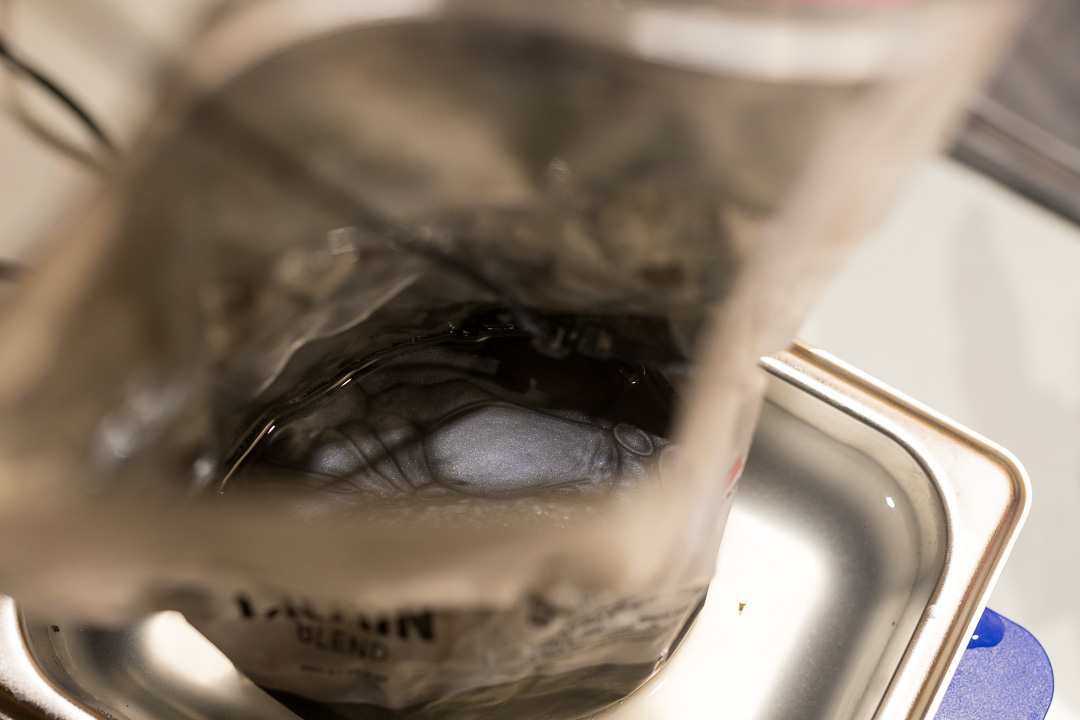
I preheated the chain with a heat gun before dipping. The goal was to avoid dropping a cold chain into wax that was already close to its solidifying point, which could form a surface film before the wax had a chance to penetrate the rollers. I placed the chain in the wax, manually agitated it, and ran the ultrasonic cleaner.
I then turned the heat off and let the wax cool toward 60 degrees Celsius. As the surface started to skin over, I pushed the film aside before lifting the chain so it would not pull out excess cooled wax. I hung the chain above the bag to drip, though there was very little runoff, then broke the links free after cooling.
Other notes
- PVD or DLC coated chains (the ones with fun colours) are not ideal for wax adhesion
- It is possible to apply too much or too little wax. Excess wax will flake off, and gum up the rear derailleur and cassette, cleaning off excess from exterior plates when drying is OK. Too little is ineffective.
- Single application is good up to around 500km in most circumstances.